
How I Make Photographs Principles and Techniques I Use Most |
||
 |
General Approach
When doing nature and landscape photography I strive for three fundamental qualities: Originality, simplicity and transcendence. I don’t always achieve every quality in every image, but it's the goal. |
Originality
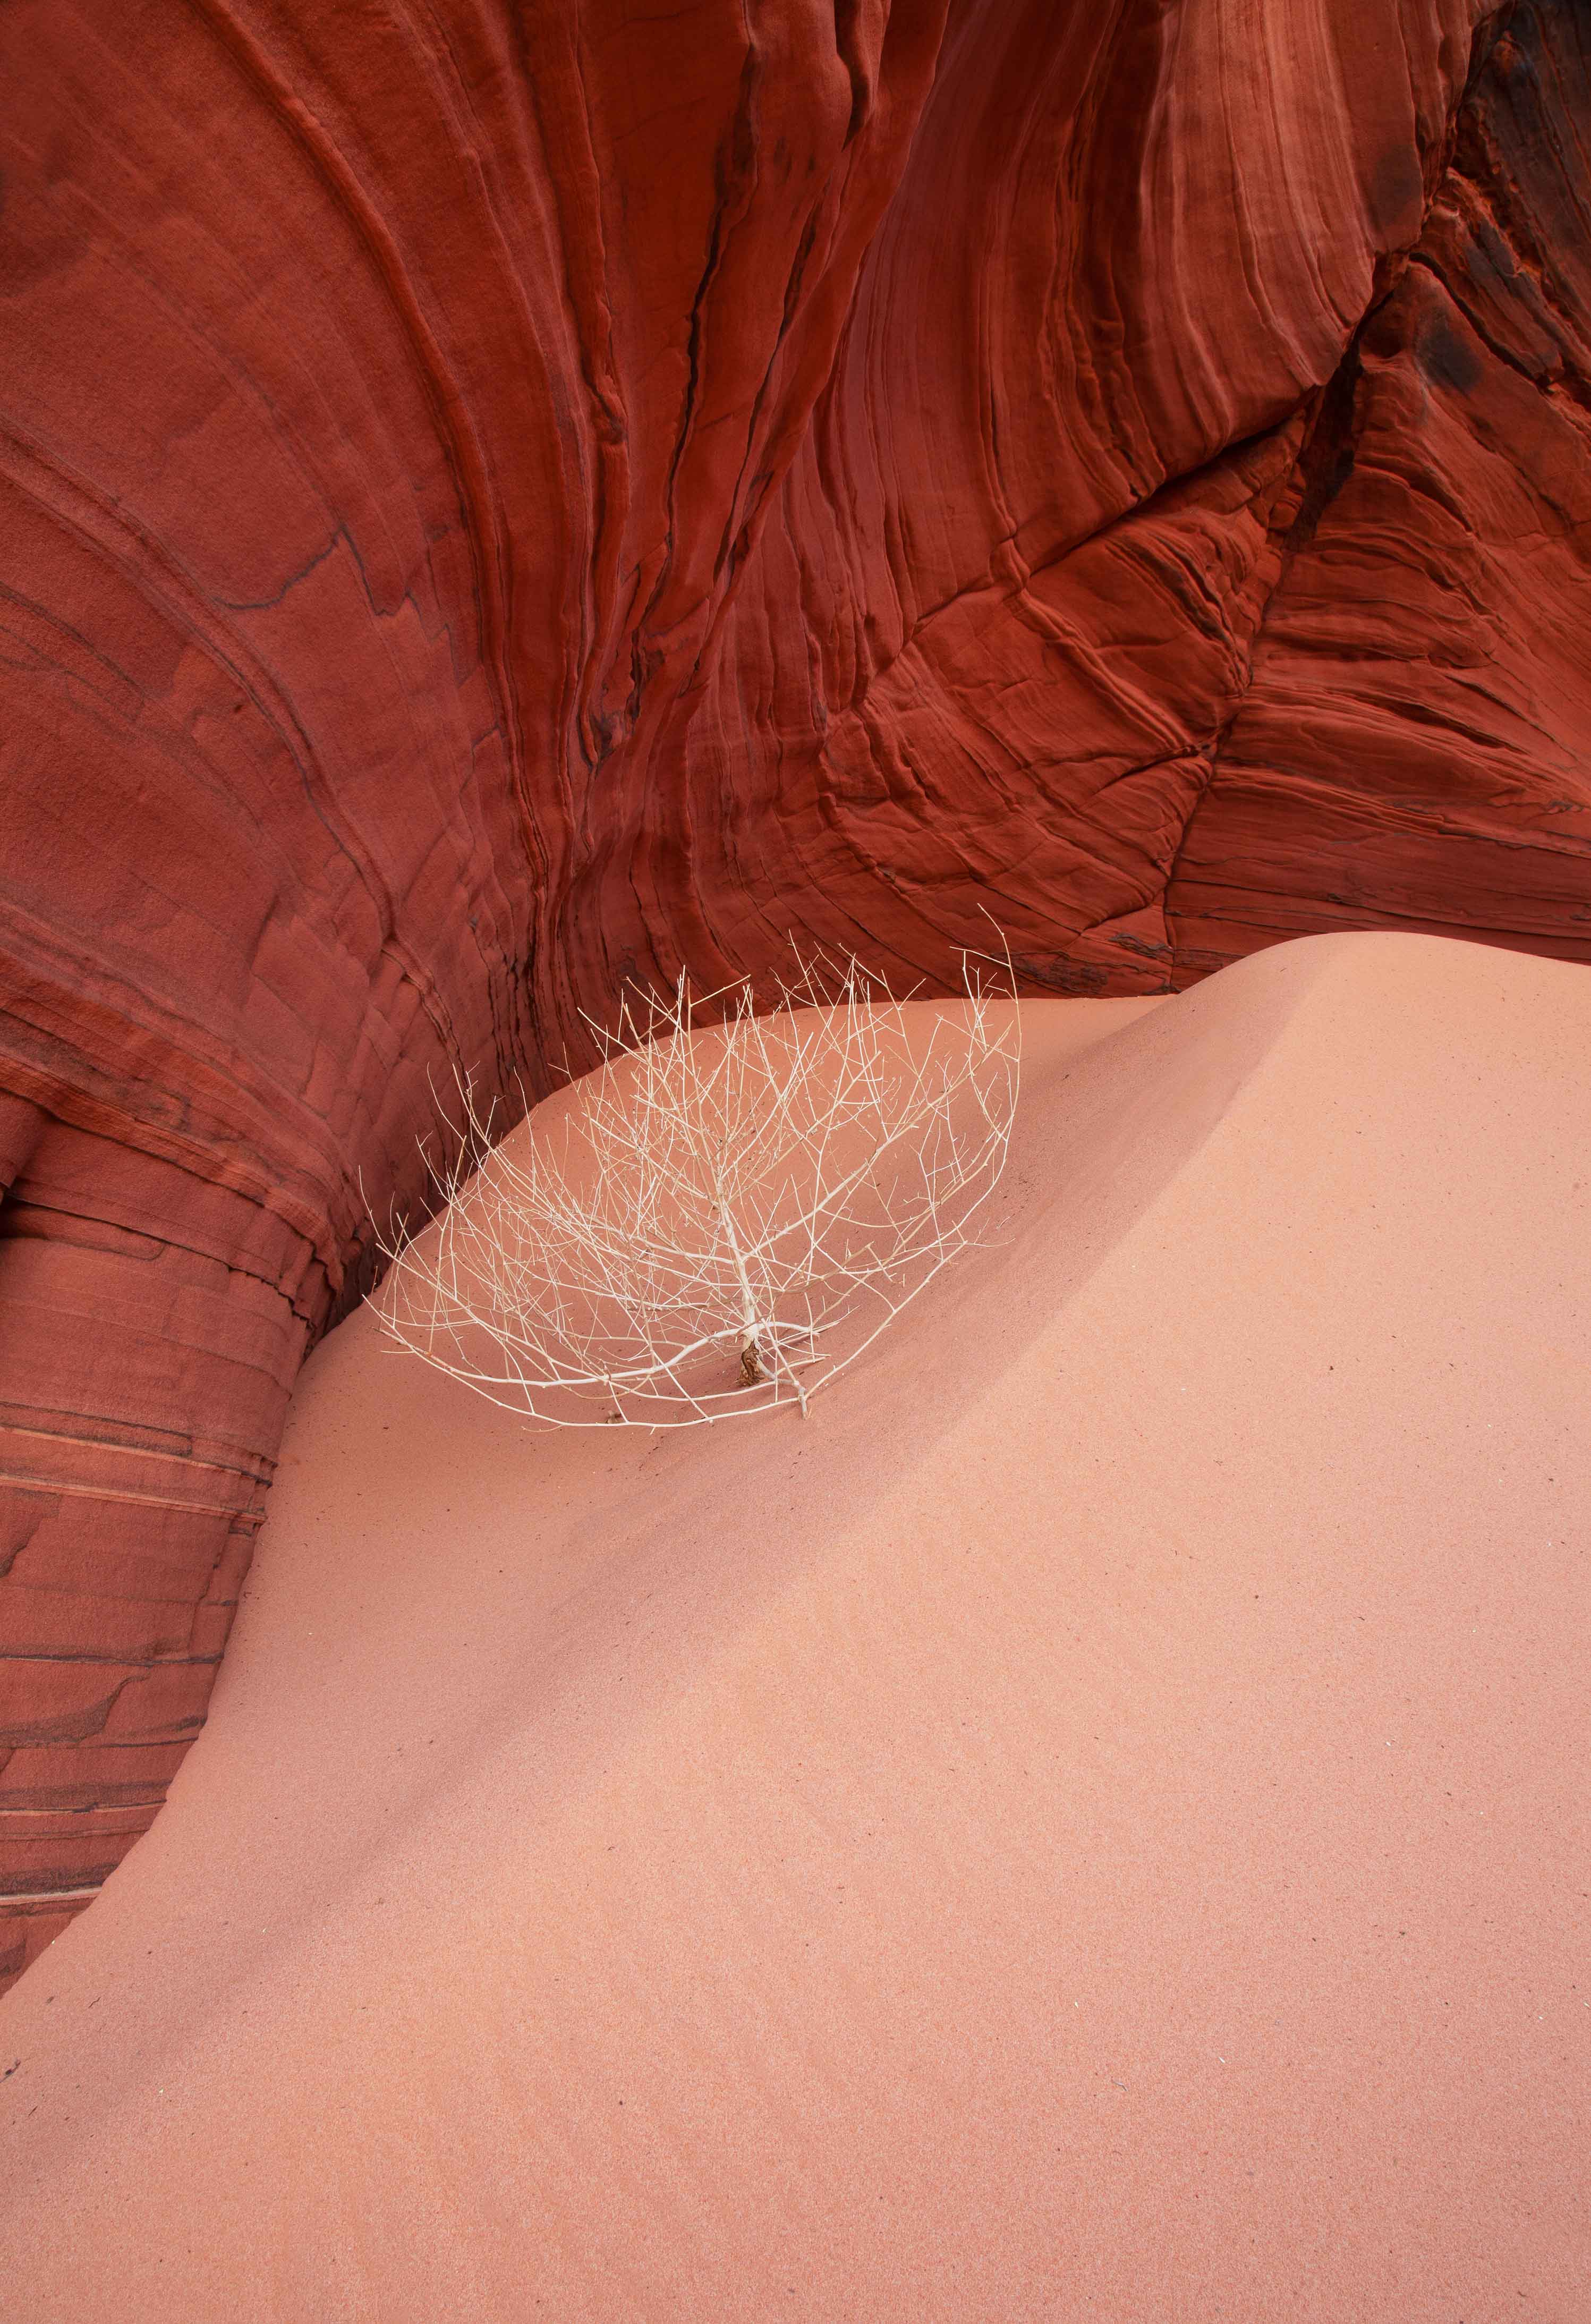
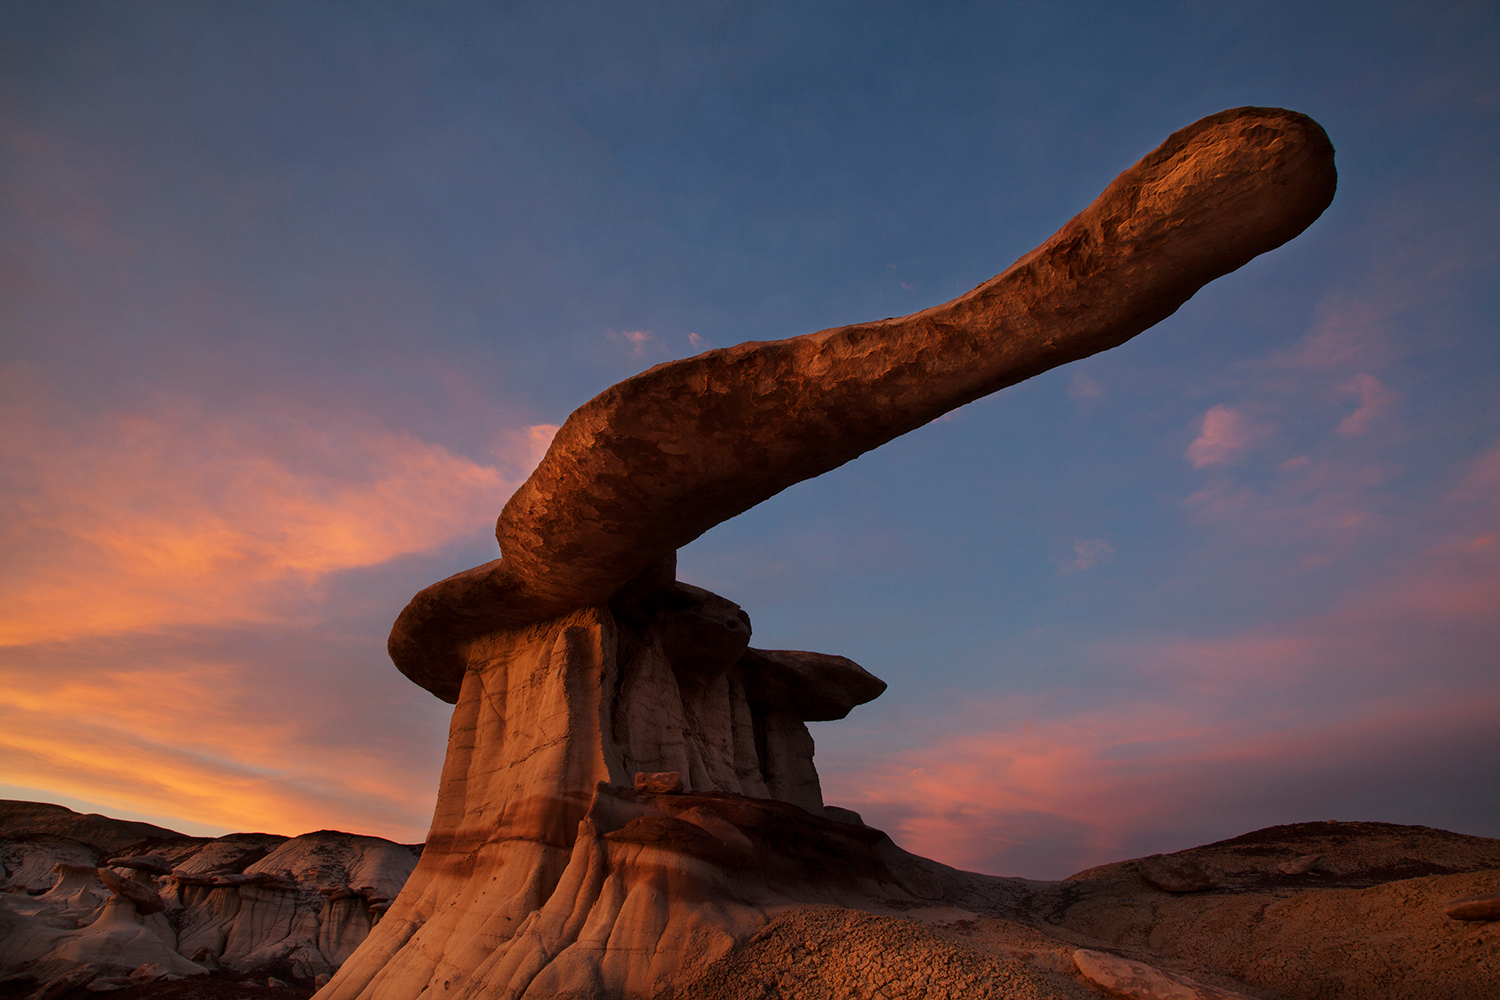
| The best perspective is the one nobody else has seen, and I place a high priority on capturing images that don't look like those of other photographers. One of the best ways to enhance originality is to simply get off the beaten path. Oh sure, I've been to my share of popular places. They have their value. However, the mark of a great landscape photographer isn't the ability to visit glamorous locations, it's the ability to find the glamor in any location. A truly great photographer can wander into virtually any landscape, even the most obscure and seemingly mundane places, and with hard work and a creative eye come away with something spectacular – and original. Although the following quote comes from a painter not a photographer, it sums up this idea perfectly. |
"If you truly love nature, you will
find beauty everywhere."
Vincent Van Gogh
Simplicity
| Creativity is not the ability to make the simple complicated. It is the ability to make the complicated simple. That being said, I strive to produce bold, uncluttered compositions with a strong sense of harmony and balance. |
Transcendence
Great nature photographs transcend mere “pretty” and exist in the realm of “beautiful.” It’s what separates fine art from postcard snapshots. But it’s more than that. I'm not religious at all. Still, I was intrigued when I heard a local Rabbi say that "Great nature photographs look like little rectangles of God.” So, why do some photographs feel Spiritual and others don't? It's hard to say, but you know the good rectangles when you see them. |
Reality (no A.I.)
It frustrates me that I even need to address this issue, but in recent years people have begun asking if I use Artificial Intelligence to create my images. The answer is no. Not now, not ever. What's the point of even doing landscape photography if you don't get out and take real photos in the real world? |
Composition
Like most photographers I use all sorts of traditional compositional principles, from leading lines and the rule of thirds to symmetry and balance. However, if I could give beginners just one bit of advice it would be this: Simplify your compositions. People new to photography (myself included decades ago) tend to pack way too much into a single image, resulting in cluttered compositions. Learn to shoot concisely, and realize that often less really is more. |
 |
The best photography advice I ever got was that "Every great photo is about one thing". Sometimes that literally means one thing. A close-up of a single flower bathed in golden sunlight, for example, may look so beautiful that it's all you need. |
 |
When getting advice from myself or others, keep in mind there isn't a single rule of composition that's written in stone. For that matter, rules of nature photography aren't written in wood, sand, water or grass either. Plus, what works for one photographer doesn't necessarily work for another. Over time we all develop our own unique styles. Still, rules of thumb can be helpful, especially for those who haven't yet developed their own style. However, the bottom line is that you are free to compose a photo any way you like, and regardless of how you do it, if the final result looks good, then it is good. |
Light
 |
If there is a second piece of advice I would give to beginning landscape photographers, in addition to simplifying compositions, it would be this: Pay more attention to light. Don't just show up at some beautiful place whenever it's convenient and snap a photo. Make an effort to arrive (or return) when you can literally cast the scene in the best possible light.
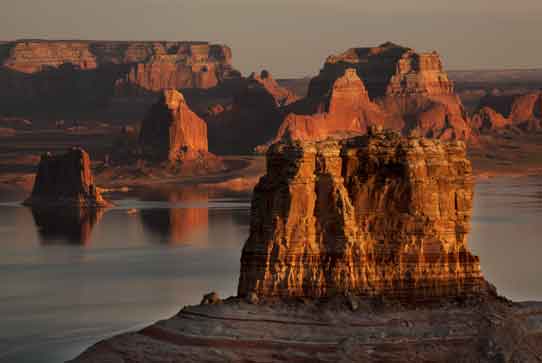
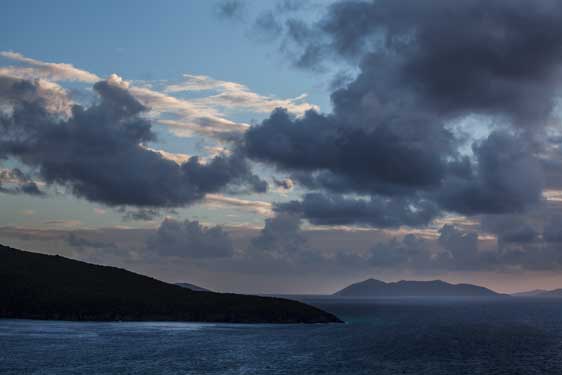
The subject of light is quite complex, but the main thing I seek while photographing landscapes is light that is soft. This means light that has been diffused, or scattered, by various natural conditions. Soft light greatly enhances colors on the landscape, making them vivid and rich, while also reducing harsh shadows. In fact, if I had to choose between taking a photo with a cell phone in great light or with a pricey Hasselblad in bad light, I'd choose the former. Yes, it makes that much difference. There are many conditions that naturally produce soft light, one of the most common being sunset. The reason light is soft at the very end of the day is because the sun is at a low angle to the landscape, causing its rays to run more parallel to the land and thus pass through more atmosphere before ultimately reaching the ground. Since the light passes through an increased amount of air it has more opportunity to scatter, becoming more diffuse and thus softer. Light at sunset also tends to be more toward the red/orange/yellow end of the color spectrum, giving everything on the land a pleasing "warm" or "golden" sort of glow. A huge percentage of my photos are taken at sunset. And by sunset I do not mean the so-called "golden hour." I consider that over-used term to be largely a misnomer. While you can certainly get ok light in the last hour before sunset, the true “golden” time, in my opinion, is usually the last 15 minutes of sunset. Actually, even that 15-minute window does not always reveal the very best light. I often shoot within five minutes of sunset to capture the absolute softest, warmest part of the "golden" time. And yes, I do this even in remote areas, which means I often end up hiking back to my vehicle in the dark. That's what headlamps and GPS are for. Don't be afraid of the dark. Be a real outdoor photographer. Shoot in the best possible light, no matter what time such light occurs, or where. The light at sunrise can be just as good as sunset. Well...it's close, anyway (strictly speaking I think sunsets are slightly softer, warmer and longer-lasting than sunrises but in terms of overall quality they're pretty darned close). The only major difference between sunrise and sunset, as far as I'm concerned, is the direction of light. Direction of light is a complex topic unto itself, but suffice it to say that if you find a composition that's truly awesome yet it just isn't working at sunset, try shooting at sunrise when the light is coming from the opposite direction. Yeah, you have to get up extra early, which admittedly I prefer not to do. But if a shot has truly great potential, and sunset is the wrong time, waking early enough to be in place and ready to shoot at the crack of dawn is worth it. Twilight, that magical time just before sunrise and just after sunset, can also be wonderful. In fact, twilight produces even softer light than sunrise or sunset. This makes it a particularly good time to photograph landscapes such as canyons that are chuck-full of giant shadows virtually anytime the sun is shining. Simply wait until the sun sets below the horizon and those shadows will largely disappear. The photo below, taken at Lake Powell (aka Glen Canyon), is a perfect example of this. |
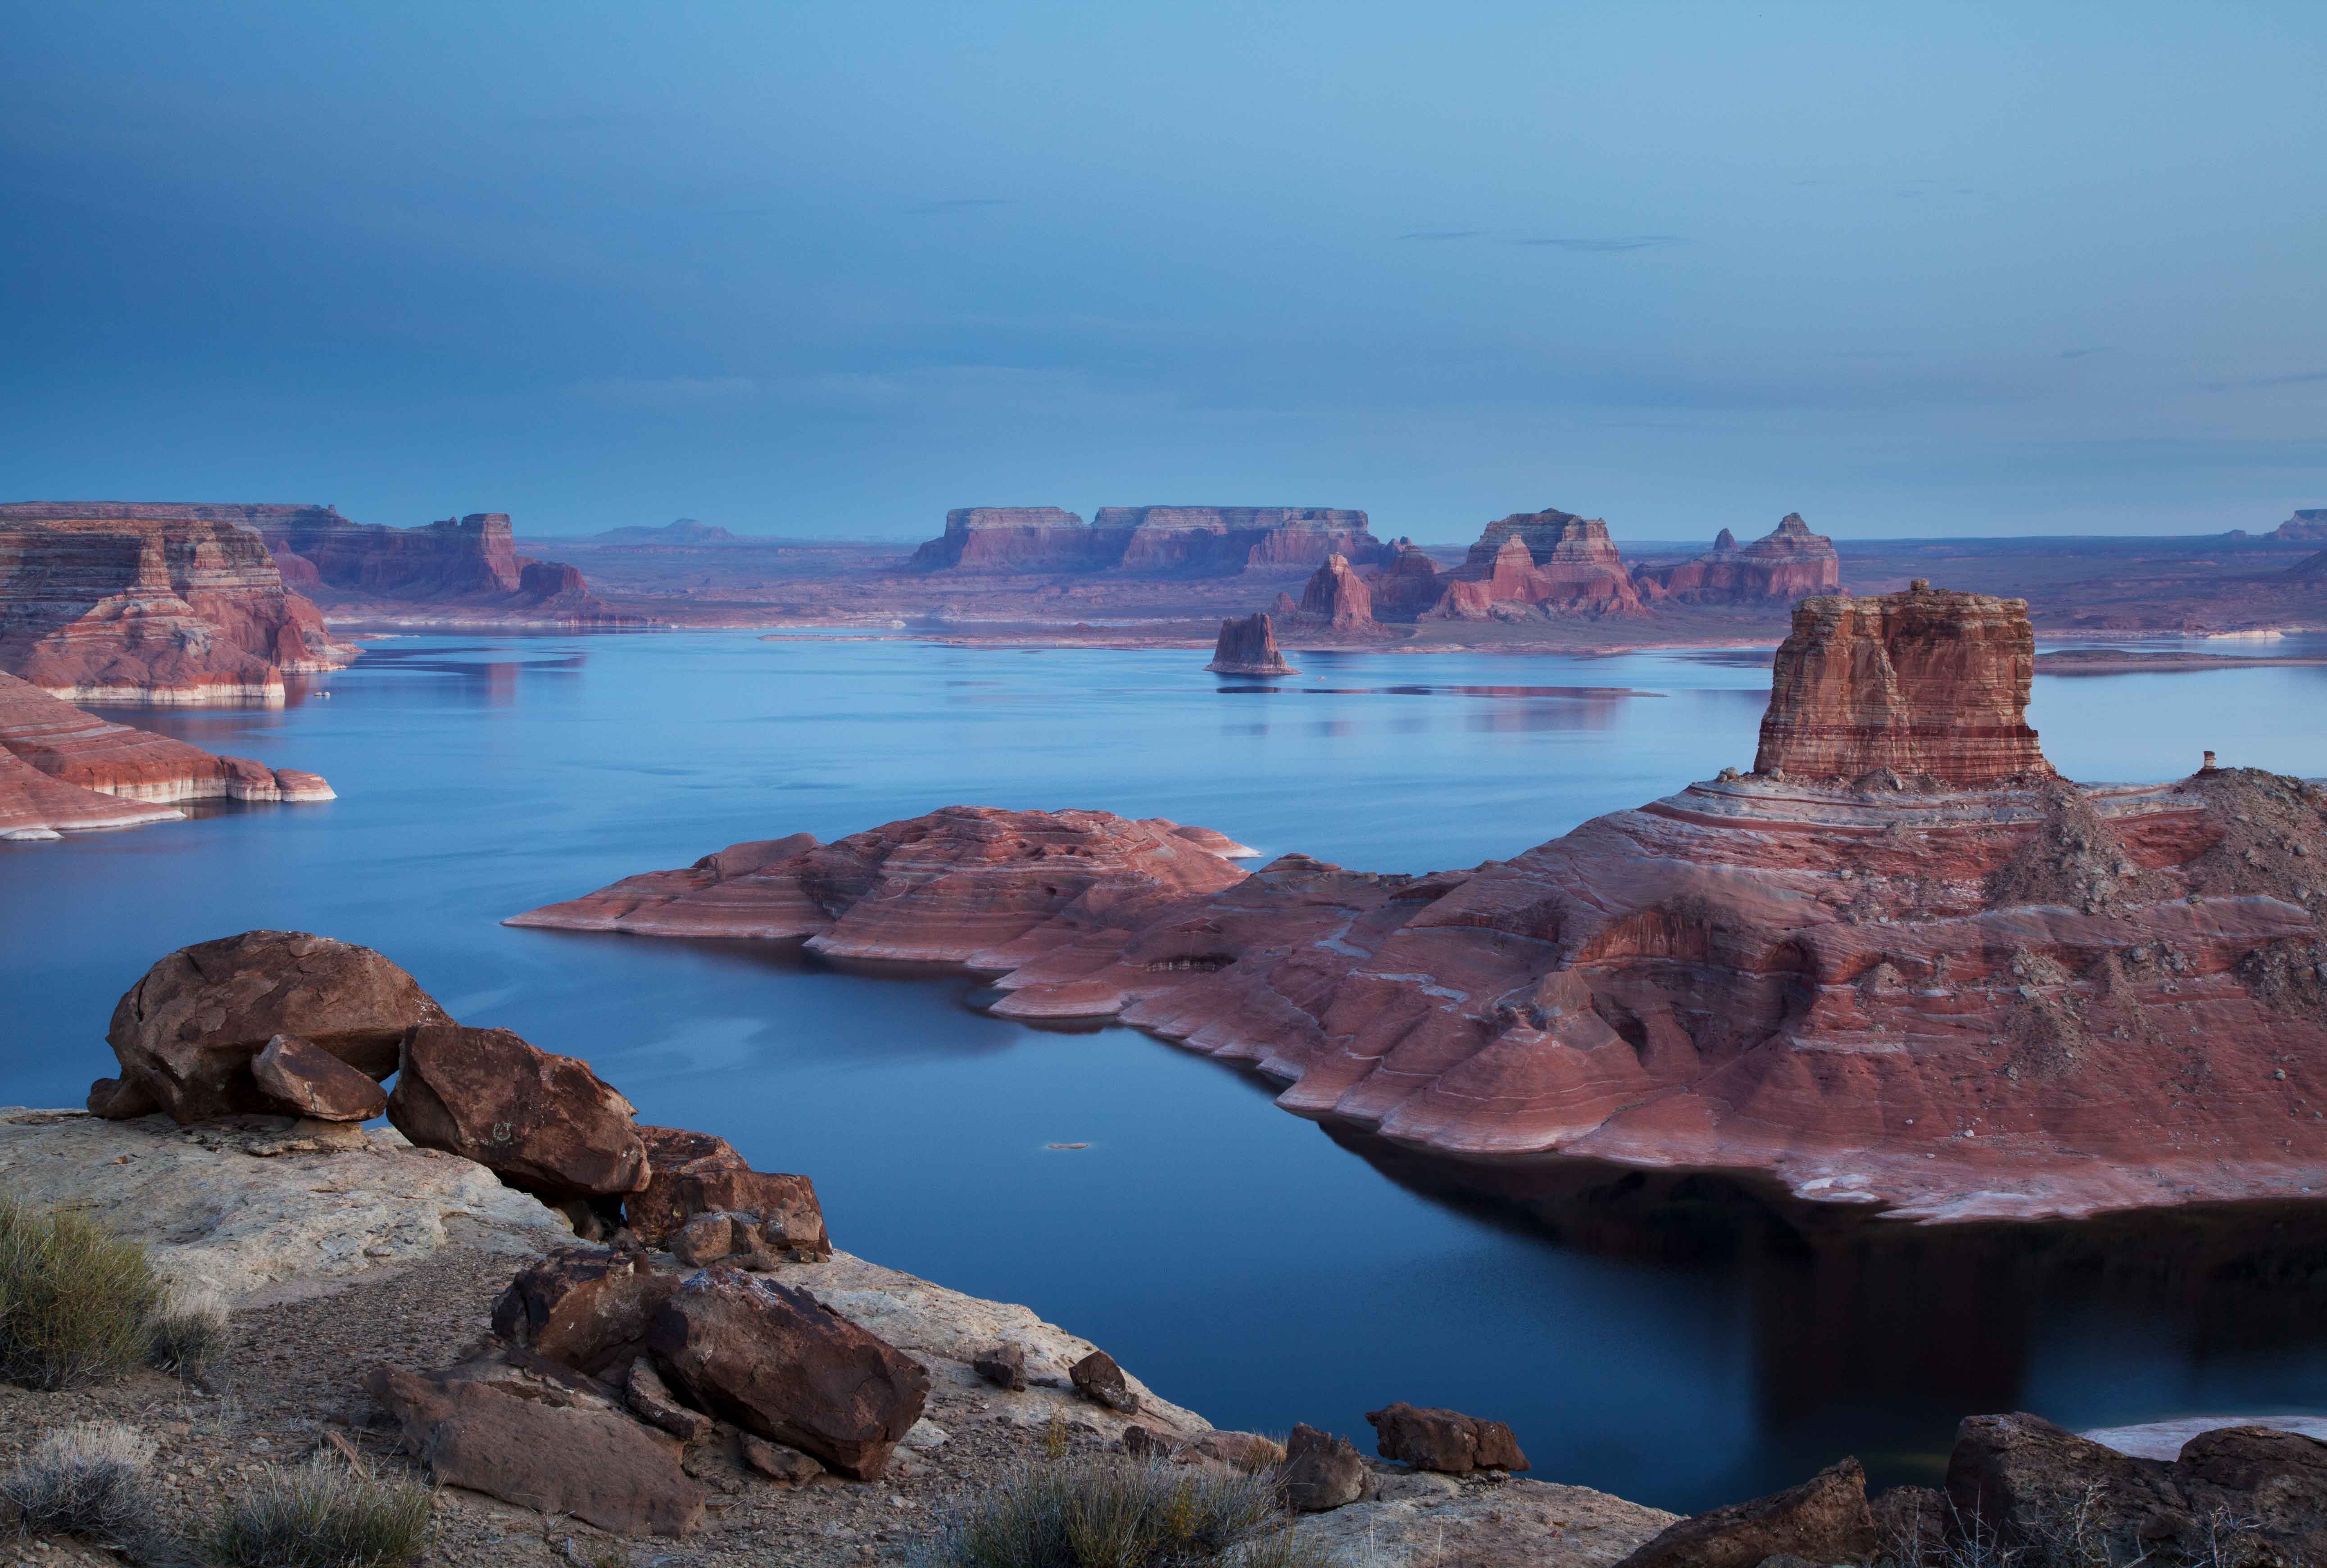 |
Also, twilight tends to make landscapes appear more "cool", meaning more toward the blue end of the spectrum (again, the above photo is a perfect example). In fact, some photographers refer to twilight as the "blue hour", even though in truth it usually lasts only 20 or 30 minutes. Of course, "cool" light is not inherently better or worse than "warm" light; it's just different. I rarely shoot in the middle of the day, but when I do it's usually when clouds are covering the sun. This is because clouds diffuse sunlight, often making it soft enough for great photographs. Another "special circumstance" for shooting in the middle of the day is when taking advantage of backlighting (shooting into the sun), which I discuss in more detail farther down this web page. However, shooting in the middle of the day remains very much the exception, not the rule. Even though the middle of cloudless sunny days are usually not great times for photography, you can still get an awful lot done when the light is bad. Take advantage of terrible mid-day photography conditions to hike around and explore an area. As you trek about, look for something awesome to shoot later. Anytime you find something interesting take some test shots, even if the light is horrible, just to evaluate the scene for composition. Keep in mind that with test shots it's not necessary to use the best possible camera settings or even your tripod. It is potential, not perfection, that you're looking for in your mid-day test shots. Later, as better lighting conditions are finally approaching (for example, the sun is starting to set), you’ll appreciate the ability to evaluate all your test shots, choose the very best one, and return to the single-best spot to re-capture it properly (yes, shoot it again). Of course, the second time around you'll use your tripod, all the right camera settings, and most importantly, the best possible light. |
Special Techniques
The above principles are very general. Following are some more specific techniques of which I am quite fond. I don't always use these techniques, but when I do they dramatically enhance my images. |
Flash
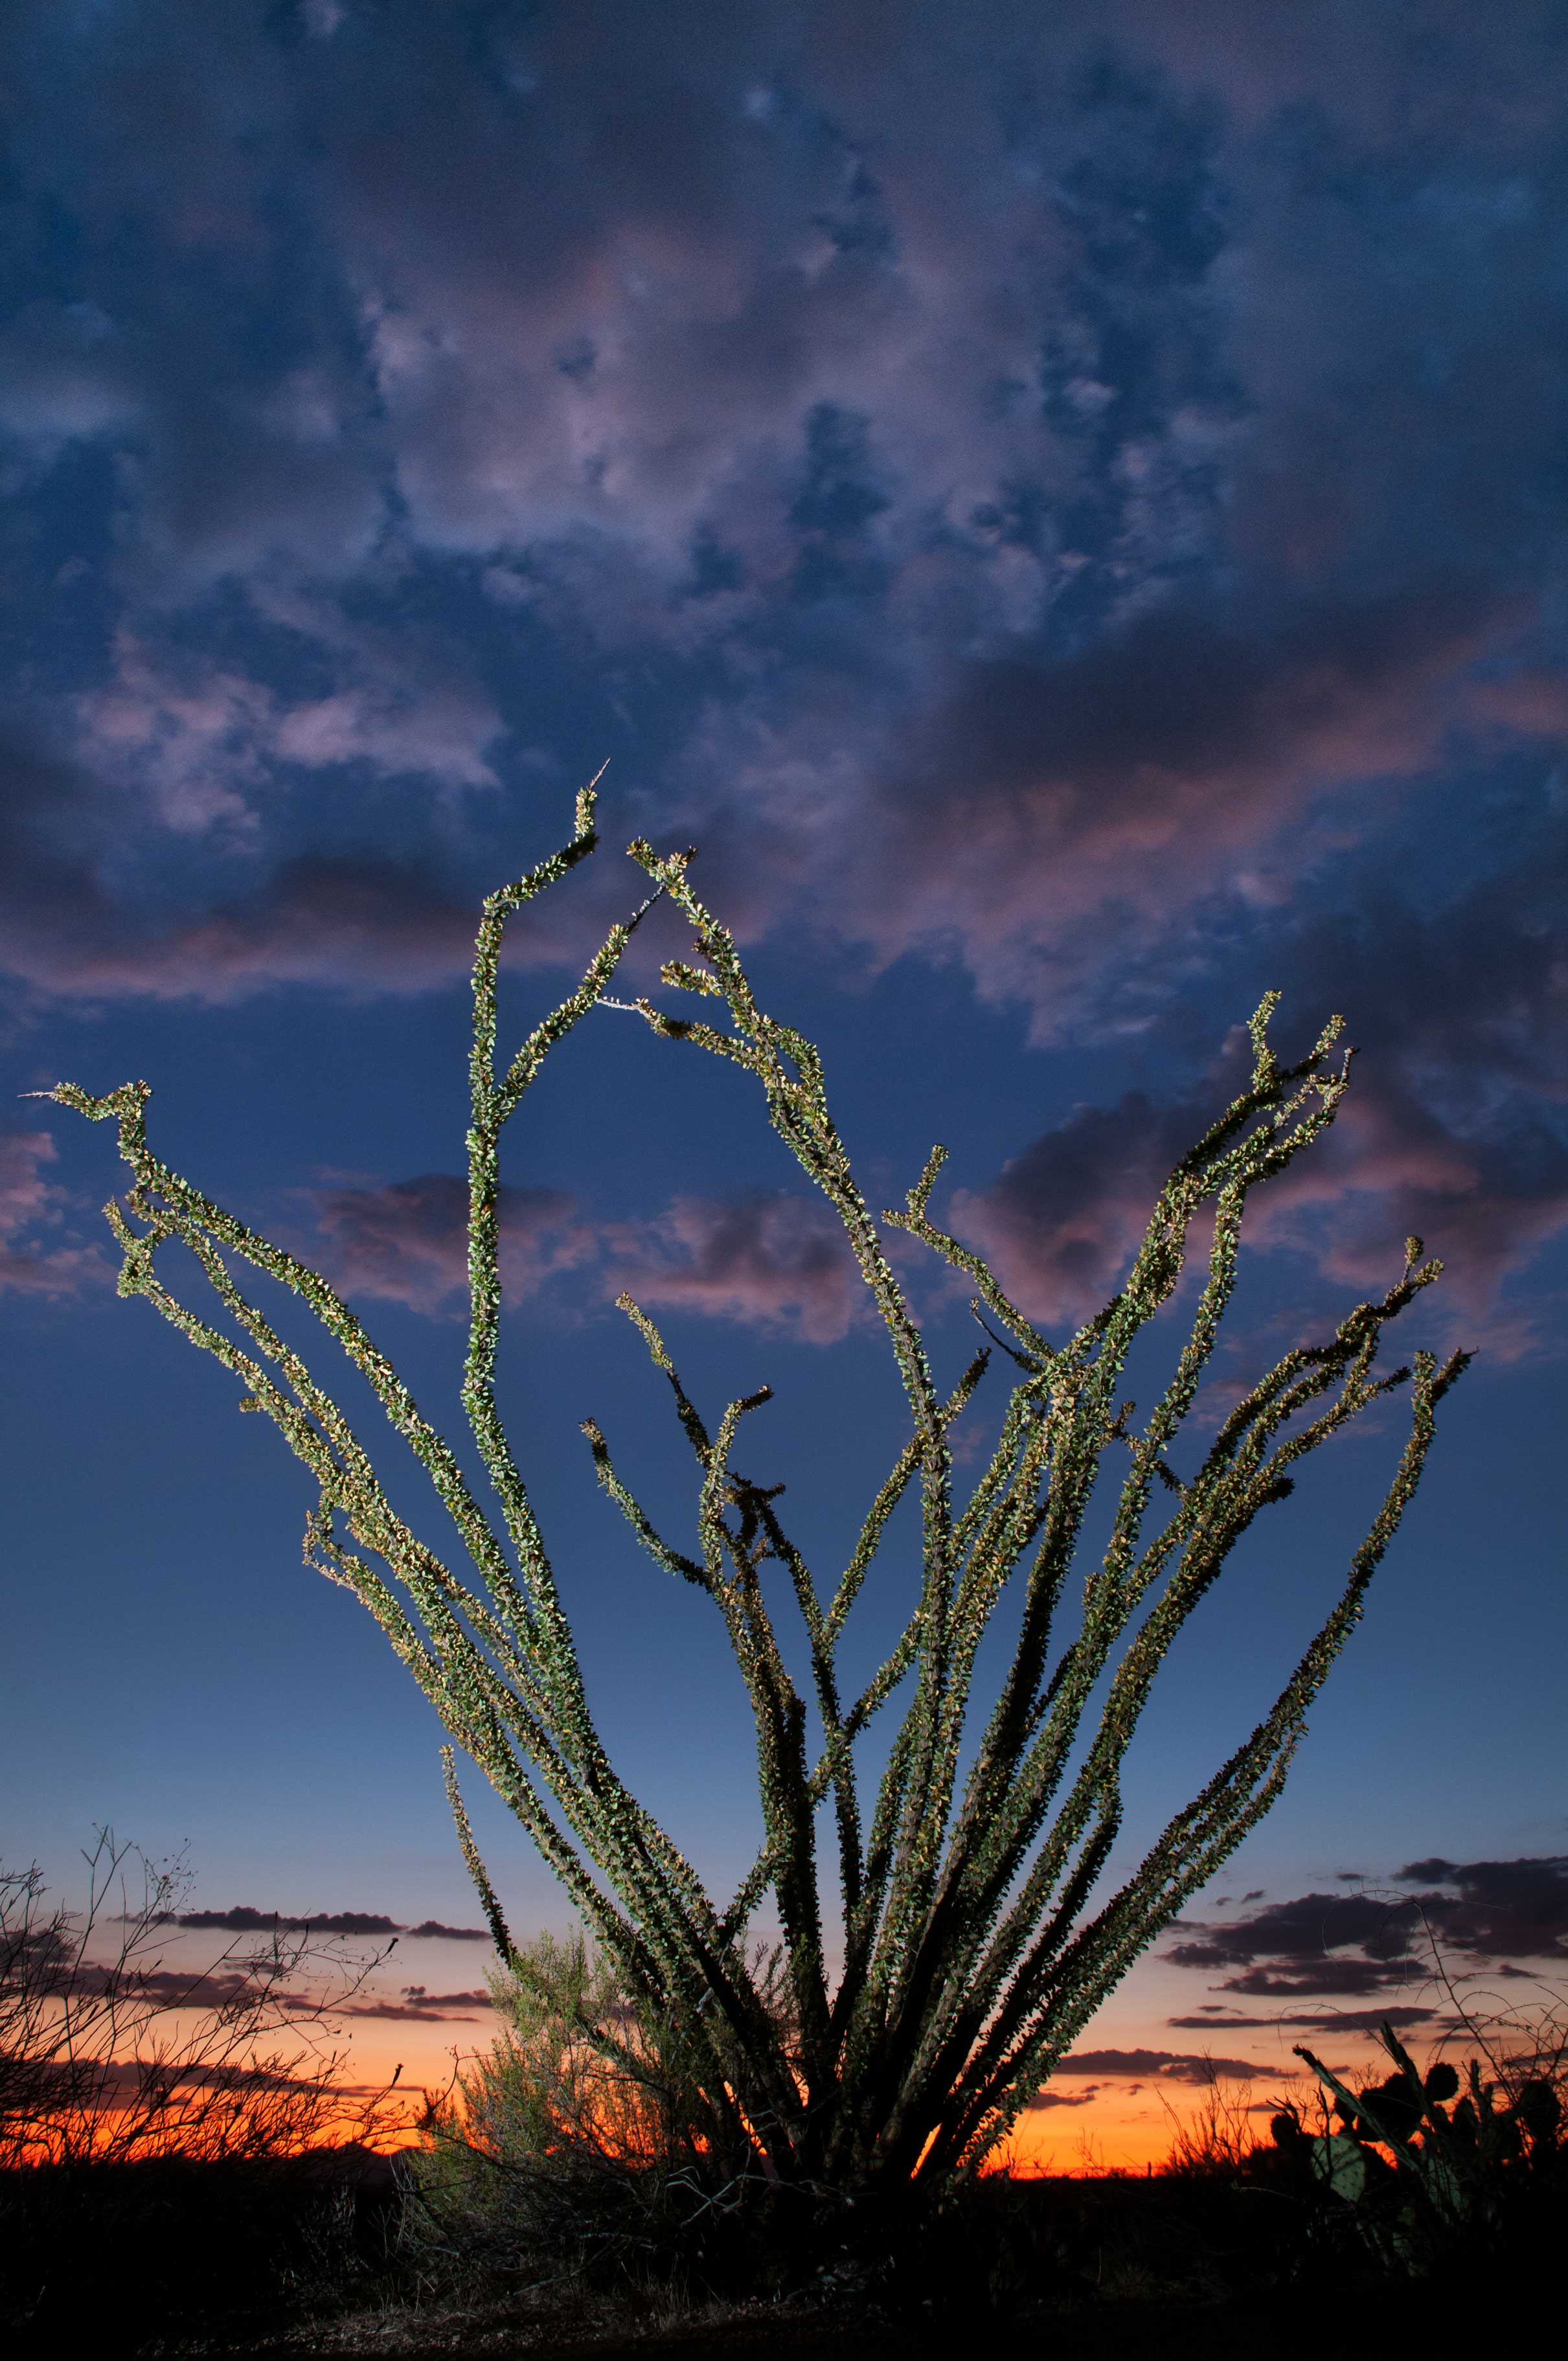 |
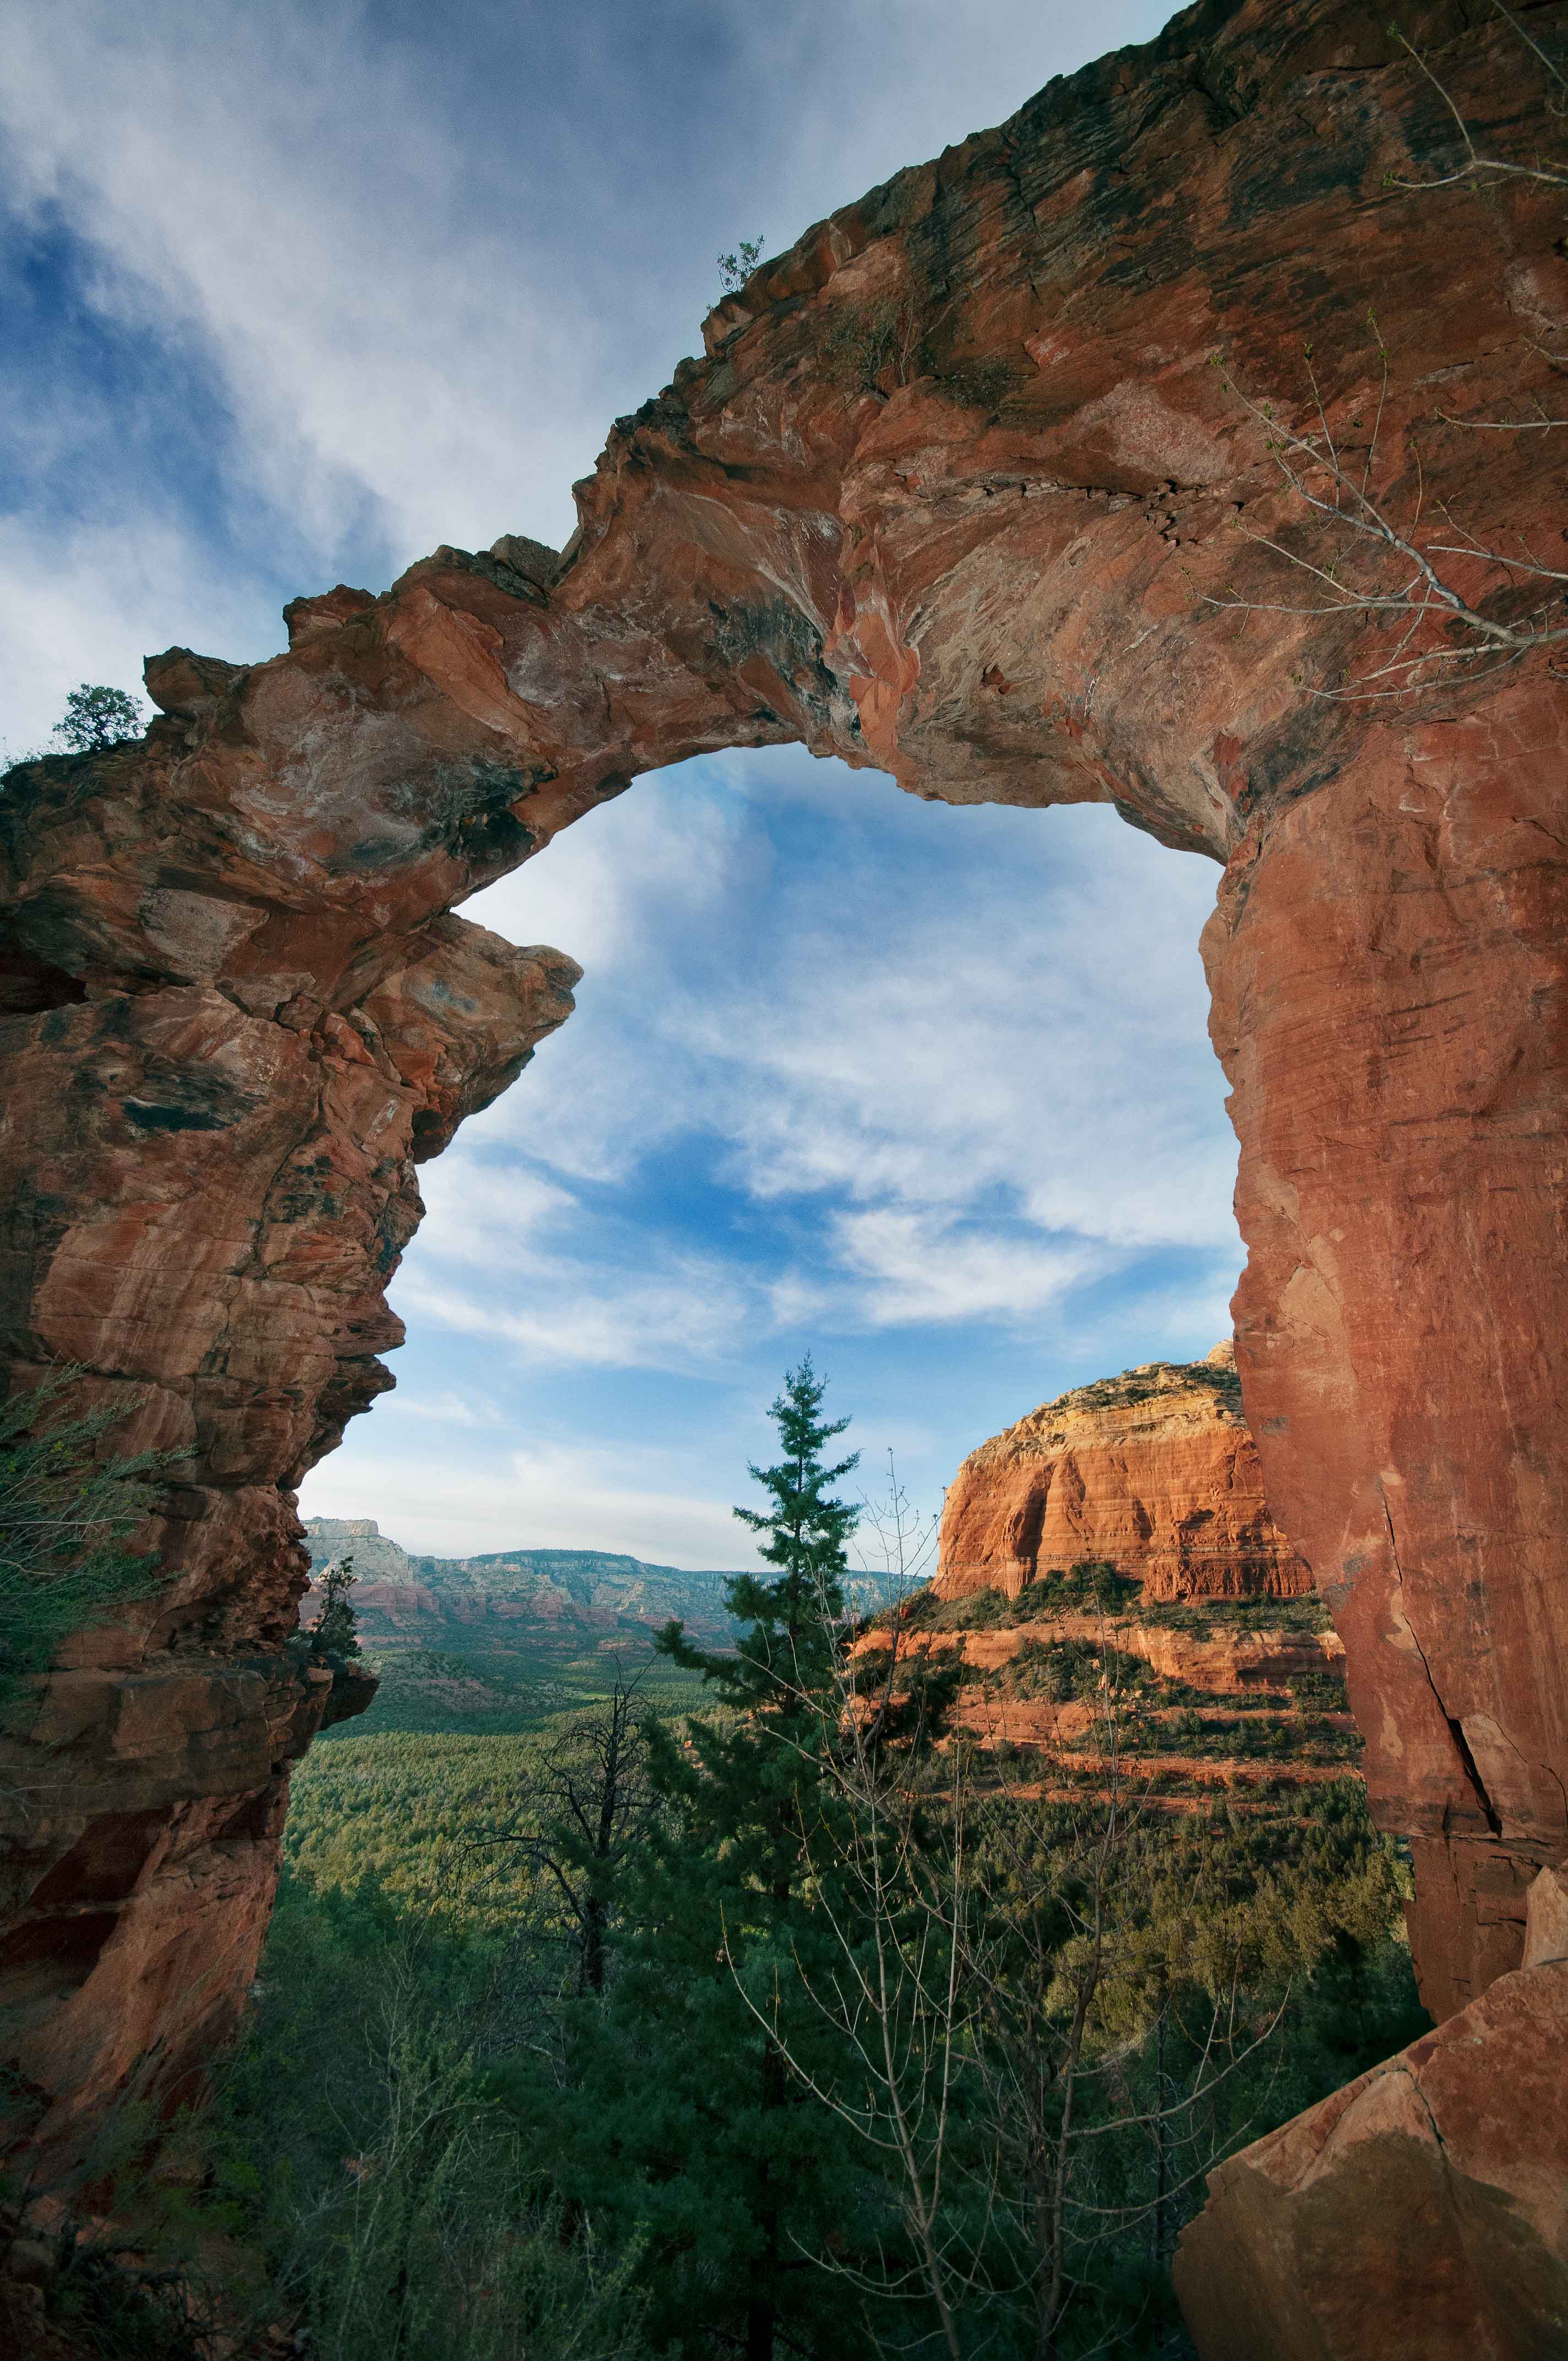 |
Some people believe if you're photographing nature you should use only natural light. In fact, I think it doesn't even occur to many landscape photographers to carry a flash into the wilderness. Well, I do carry a flash while hiking. Always. Often an object in the foreground is much darker than the background sky, so I use a flash to balance the exposure. In the photo at upper-left, the ocotillo was originally so dark it looked like a silhouette, so I lit it up. Larger objects, like the Devil's Bridge at upper-right, may require multiple flashes (in this case, three). So if the lighting in these images looks a bit unnatural...well...it is. But these photos looked like this when they were taken and I like the somewhat surreal look achieved by adding my own light to the foreground. How much foreground you can actually light up depends on a number of factors, including of course the power of your flash. However, even the best flashes have a very limited range, so when I say "light up the foreground" I mean the immediate foreground. My own flash, which is pretty darned good, allegedly has a maximum range of about 120 feet. However, if I want to shoot at f/16 for good depth of field, ISO 100 to reduce noise, and still provide enough light on the foreground to match a much brighter background sky, I'm lucky to get 15 to 20 feet of effective distance out of it. Beyond that everything on the landscape is lit only by natural light. Still, even illuminating the first 15 or 20 feet can, in some cases, dramatically improve a photo. Also, you'll get far better results with your flash if you remove it from the camera's hot shoe and hold it off to the side. Illuminating one side of an object more than the other creates a sense of depth, making it appear less flat and more "three dimensional". Using a single flash remotely requires a triggering accessory, such as a PocketWizard. My trigger system is wireless and very small. If using multimple flashes it's also possible to keep a "master" flash on the hotshoe, which will activate additional "slave" flashes remotely. Finally, if you're wondering, there are indeed alternatives to using flash to "fix" very dark foregrounds. HDR, which I discuss later, can also be a great way to "even out" difficult exposures. In fact, sometimes HDR produces better results. But other times flash works better. Sometimes I even use HDR and flash together in the same photo. It all depends on the scene and how the sun and shadows are dancing about at the moment. |
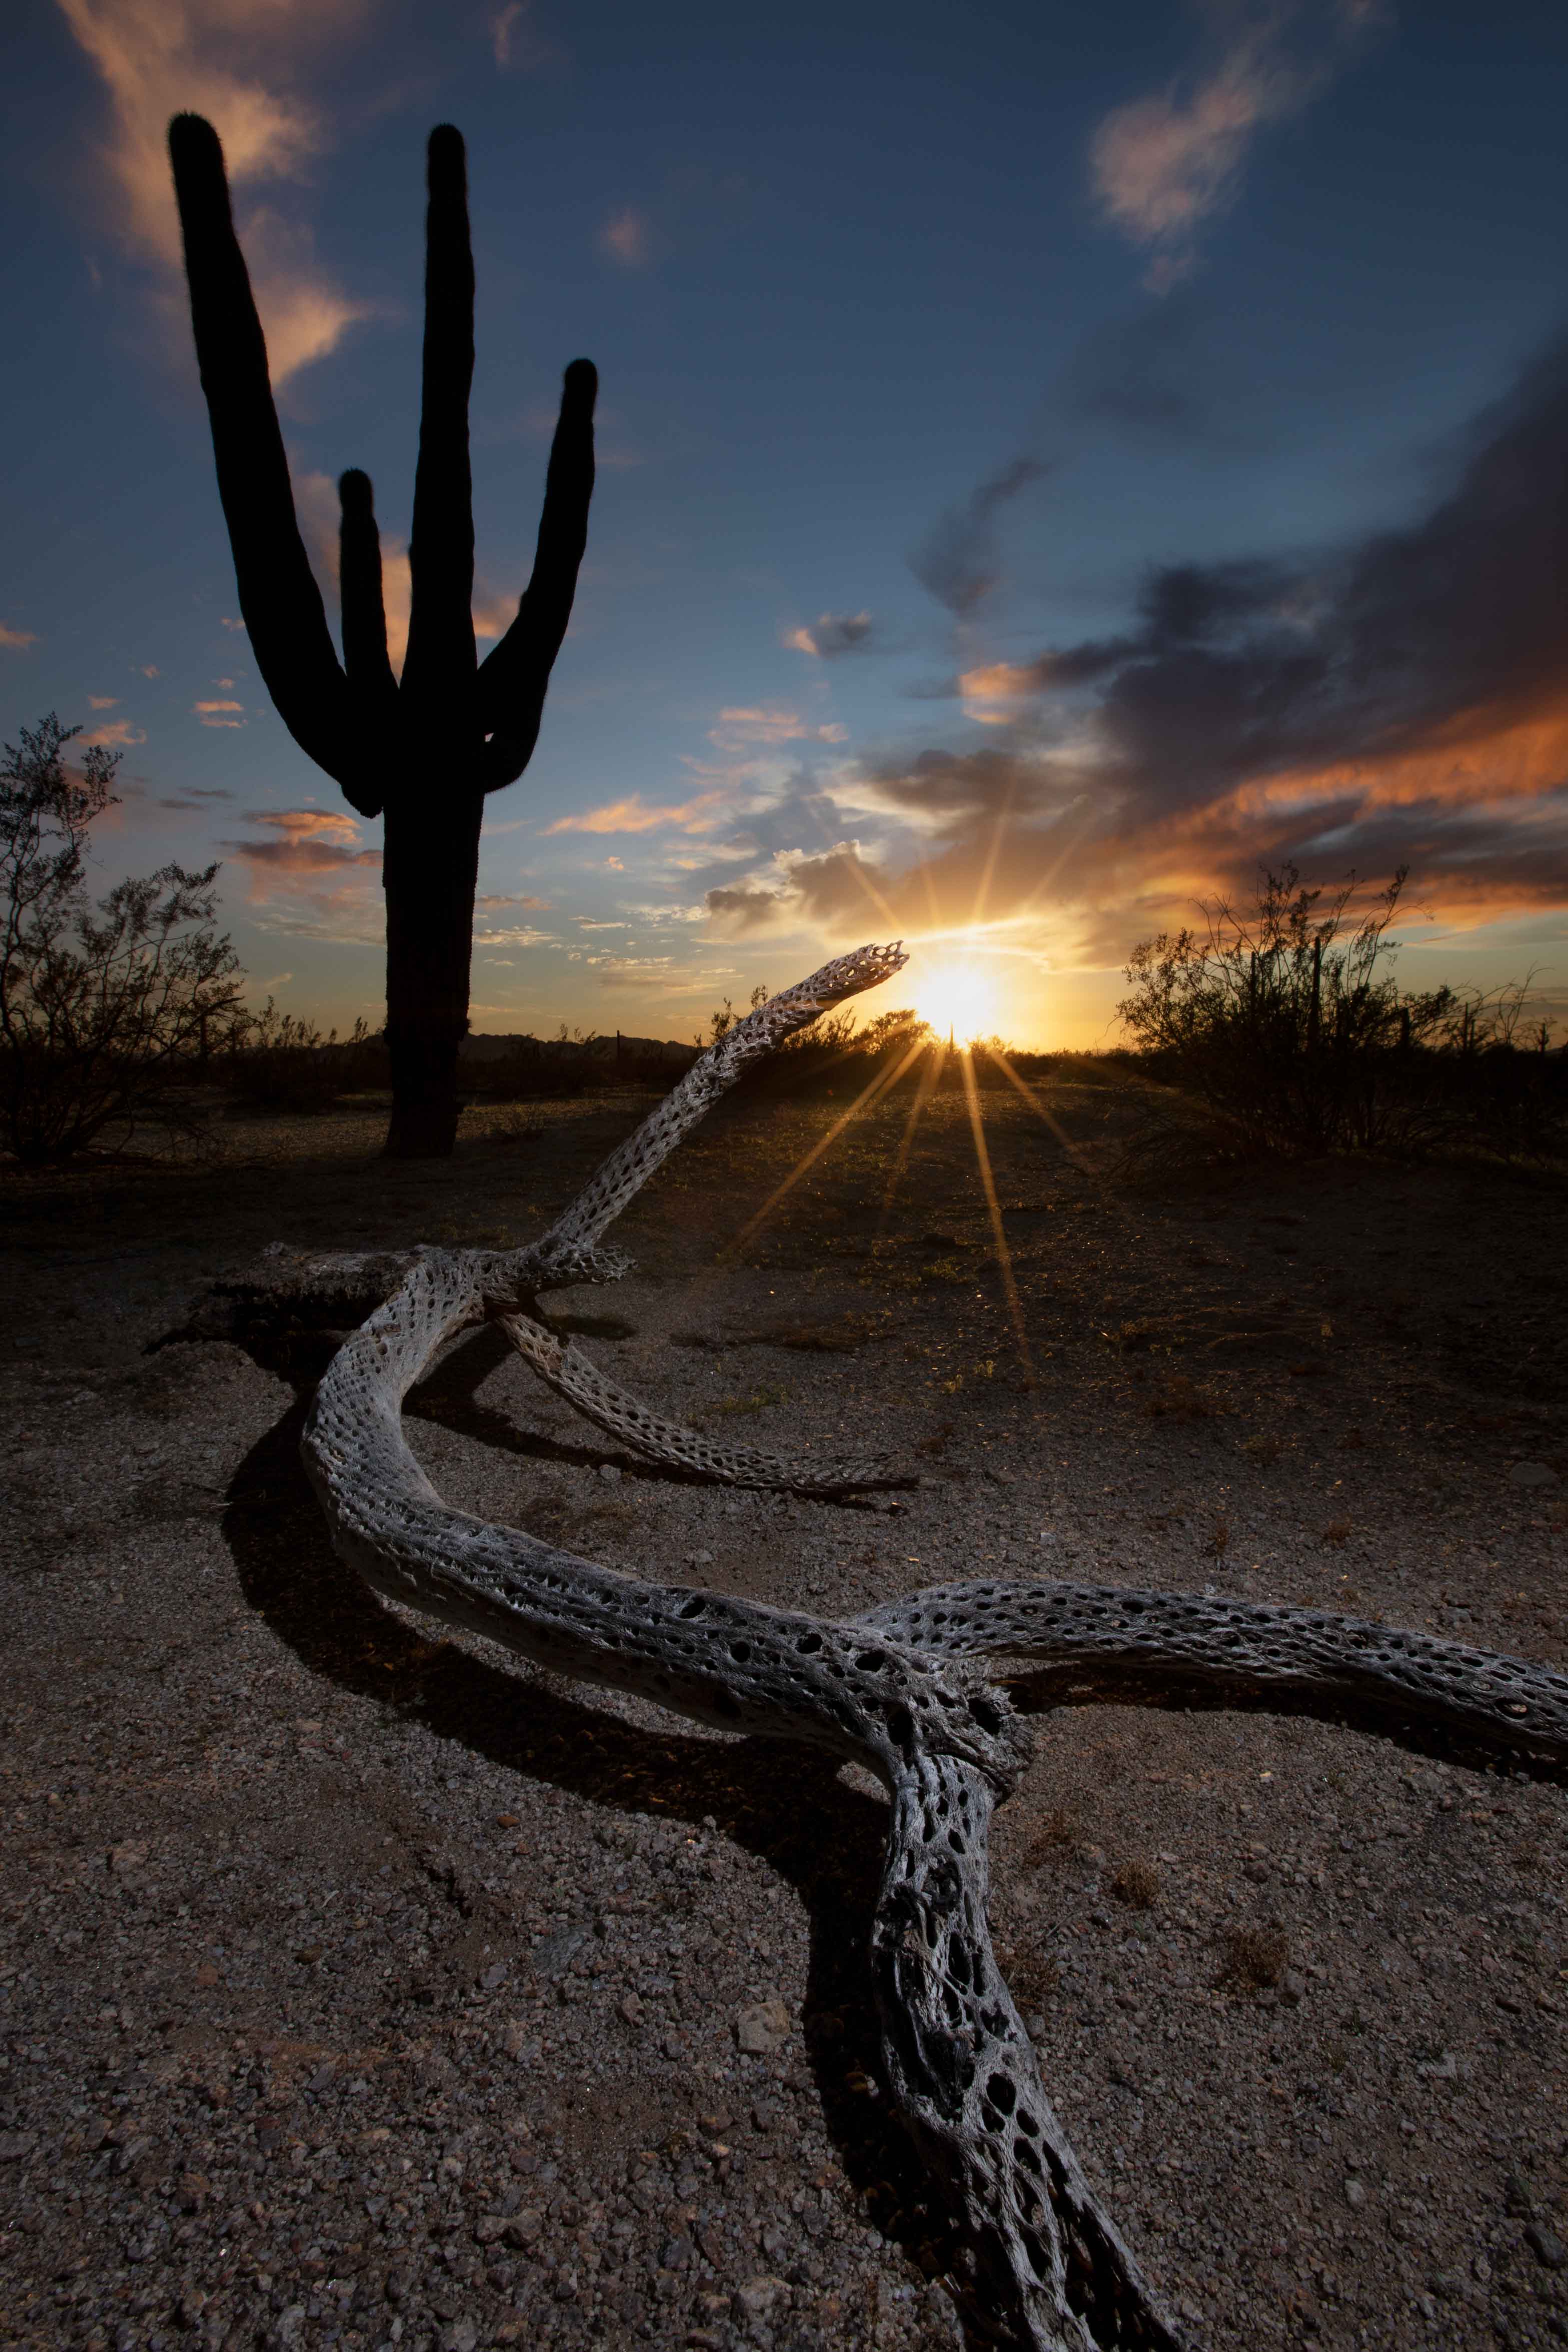
Backlighting
Most landscape photos look best with the sun coming from some angle behind you or maybe even at 90 degrees. However, that is far from being an absolute rule. A very high percentage of my images are actully backlit, meaning I often shoot right into the sun. This can create a wide range of interesting effects. |
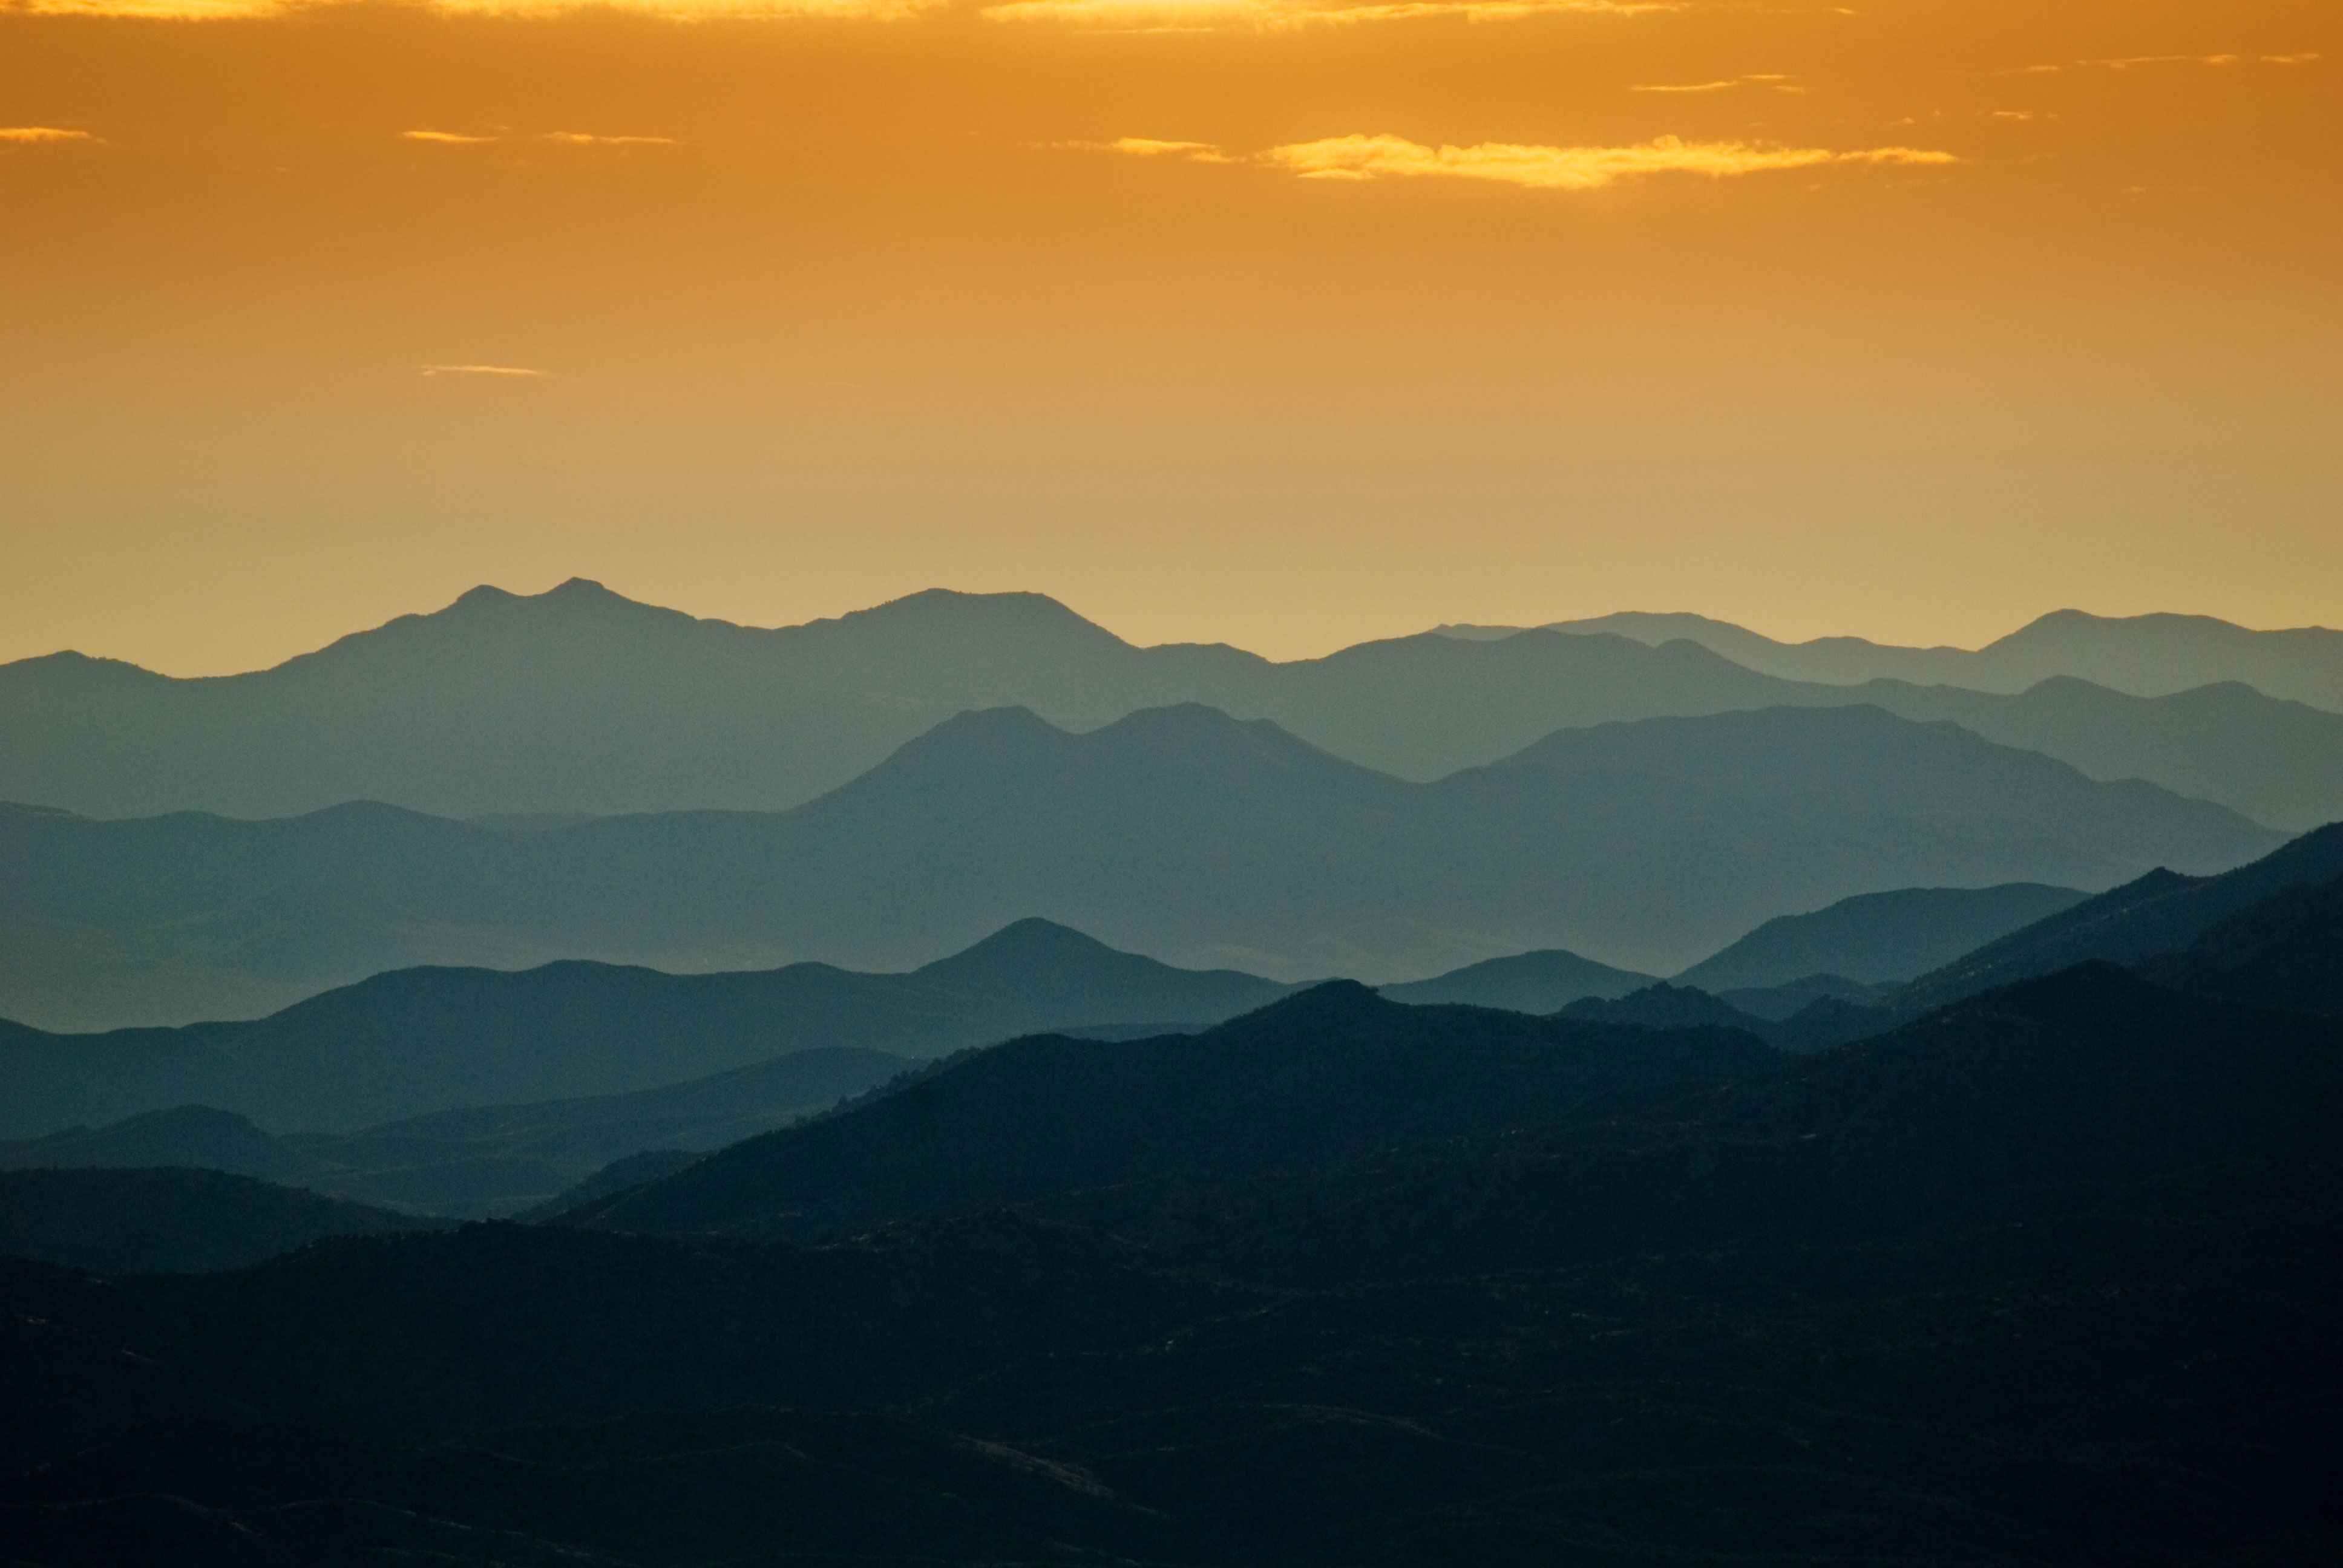 |
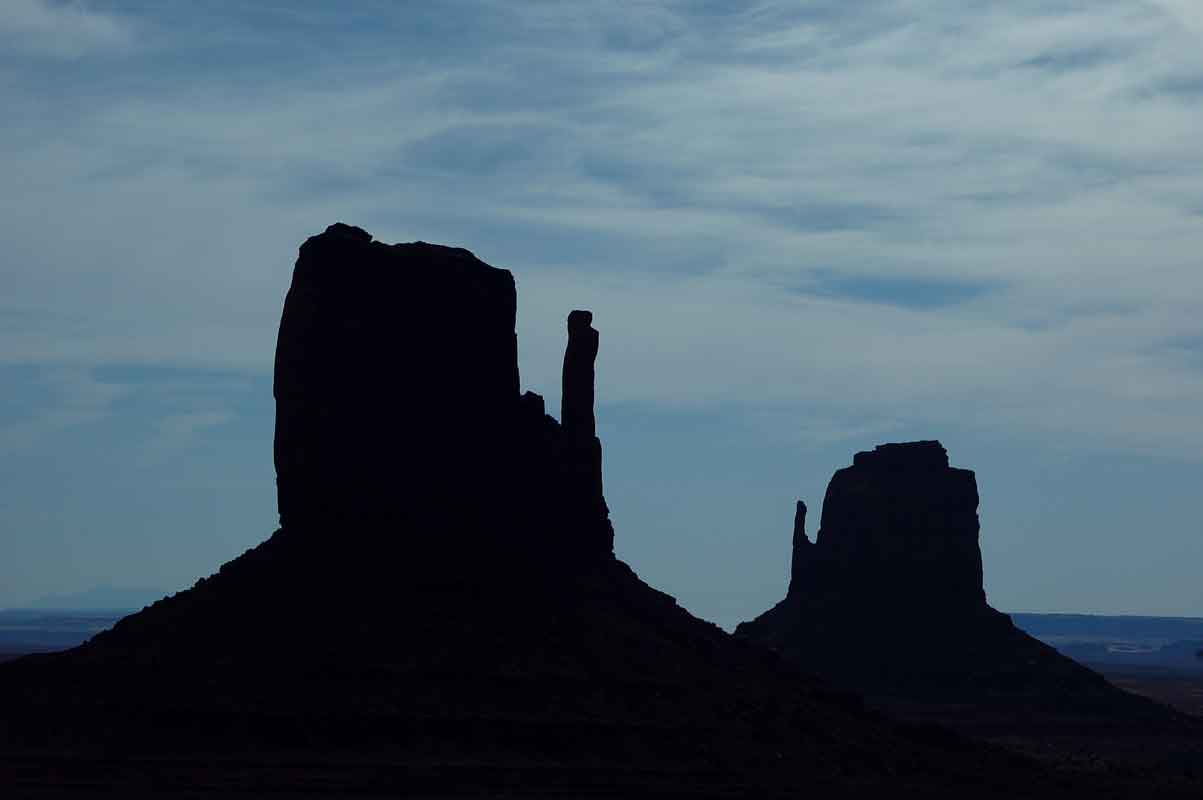
Most photographers strive for as much detail as possible in every photograph they make. Occasionally I do the opposite. The above photo was taken shooting almost directly into the rising sun. More precisely, the sun is just above the top edge of the image, so that I'm shooting just slightly beneath it. By doing this, all of the ridges in the mountains were reduced to simple tones, from dark on the bottom to light at the top. Compositions like this, sometimes called "stacked ridges", possess a simple elegance that can only be achieved with backlighting. Keep in mind, though, that if something becomes too backlit it can lose every bit of its detail and even its color. In other words, it can become a silhouette. Now, sillhouettes can also be very cool, but that may or may not be what you're shooting for. |
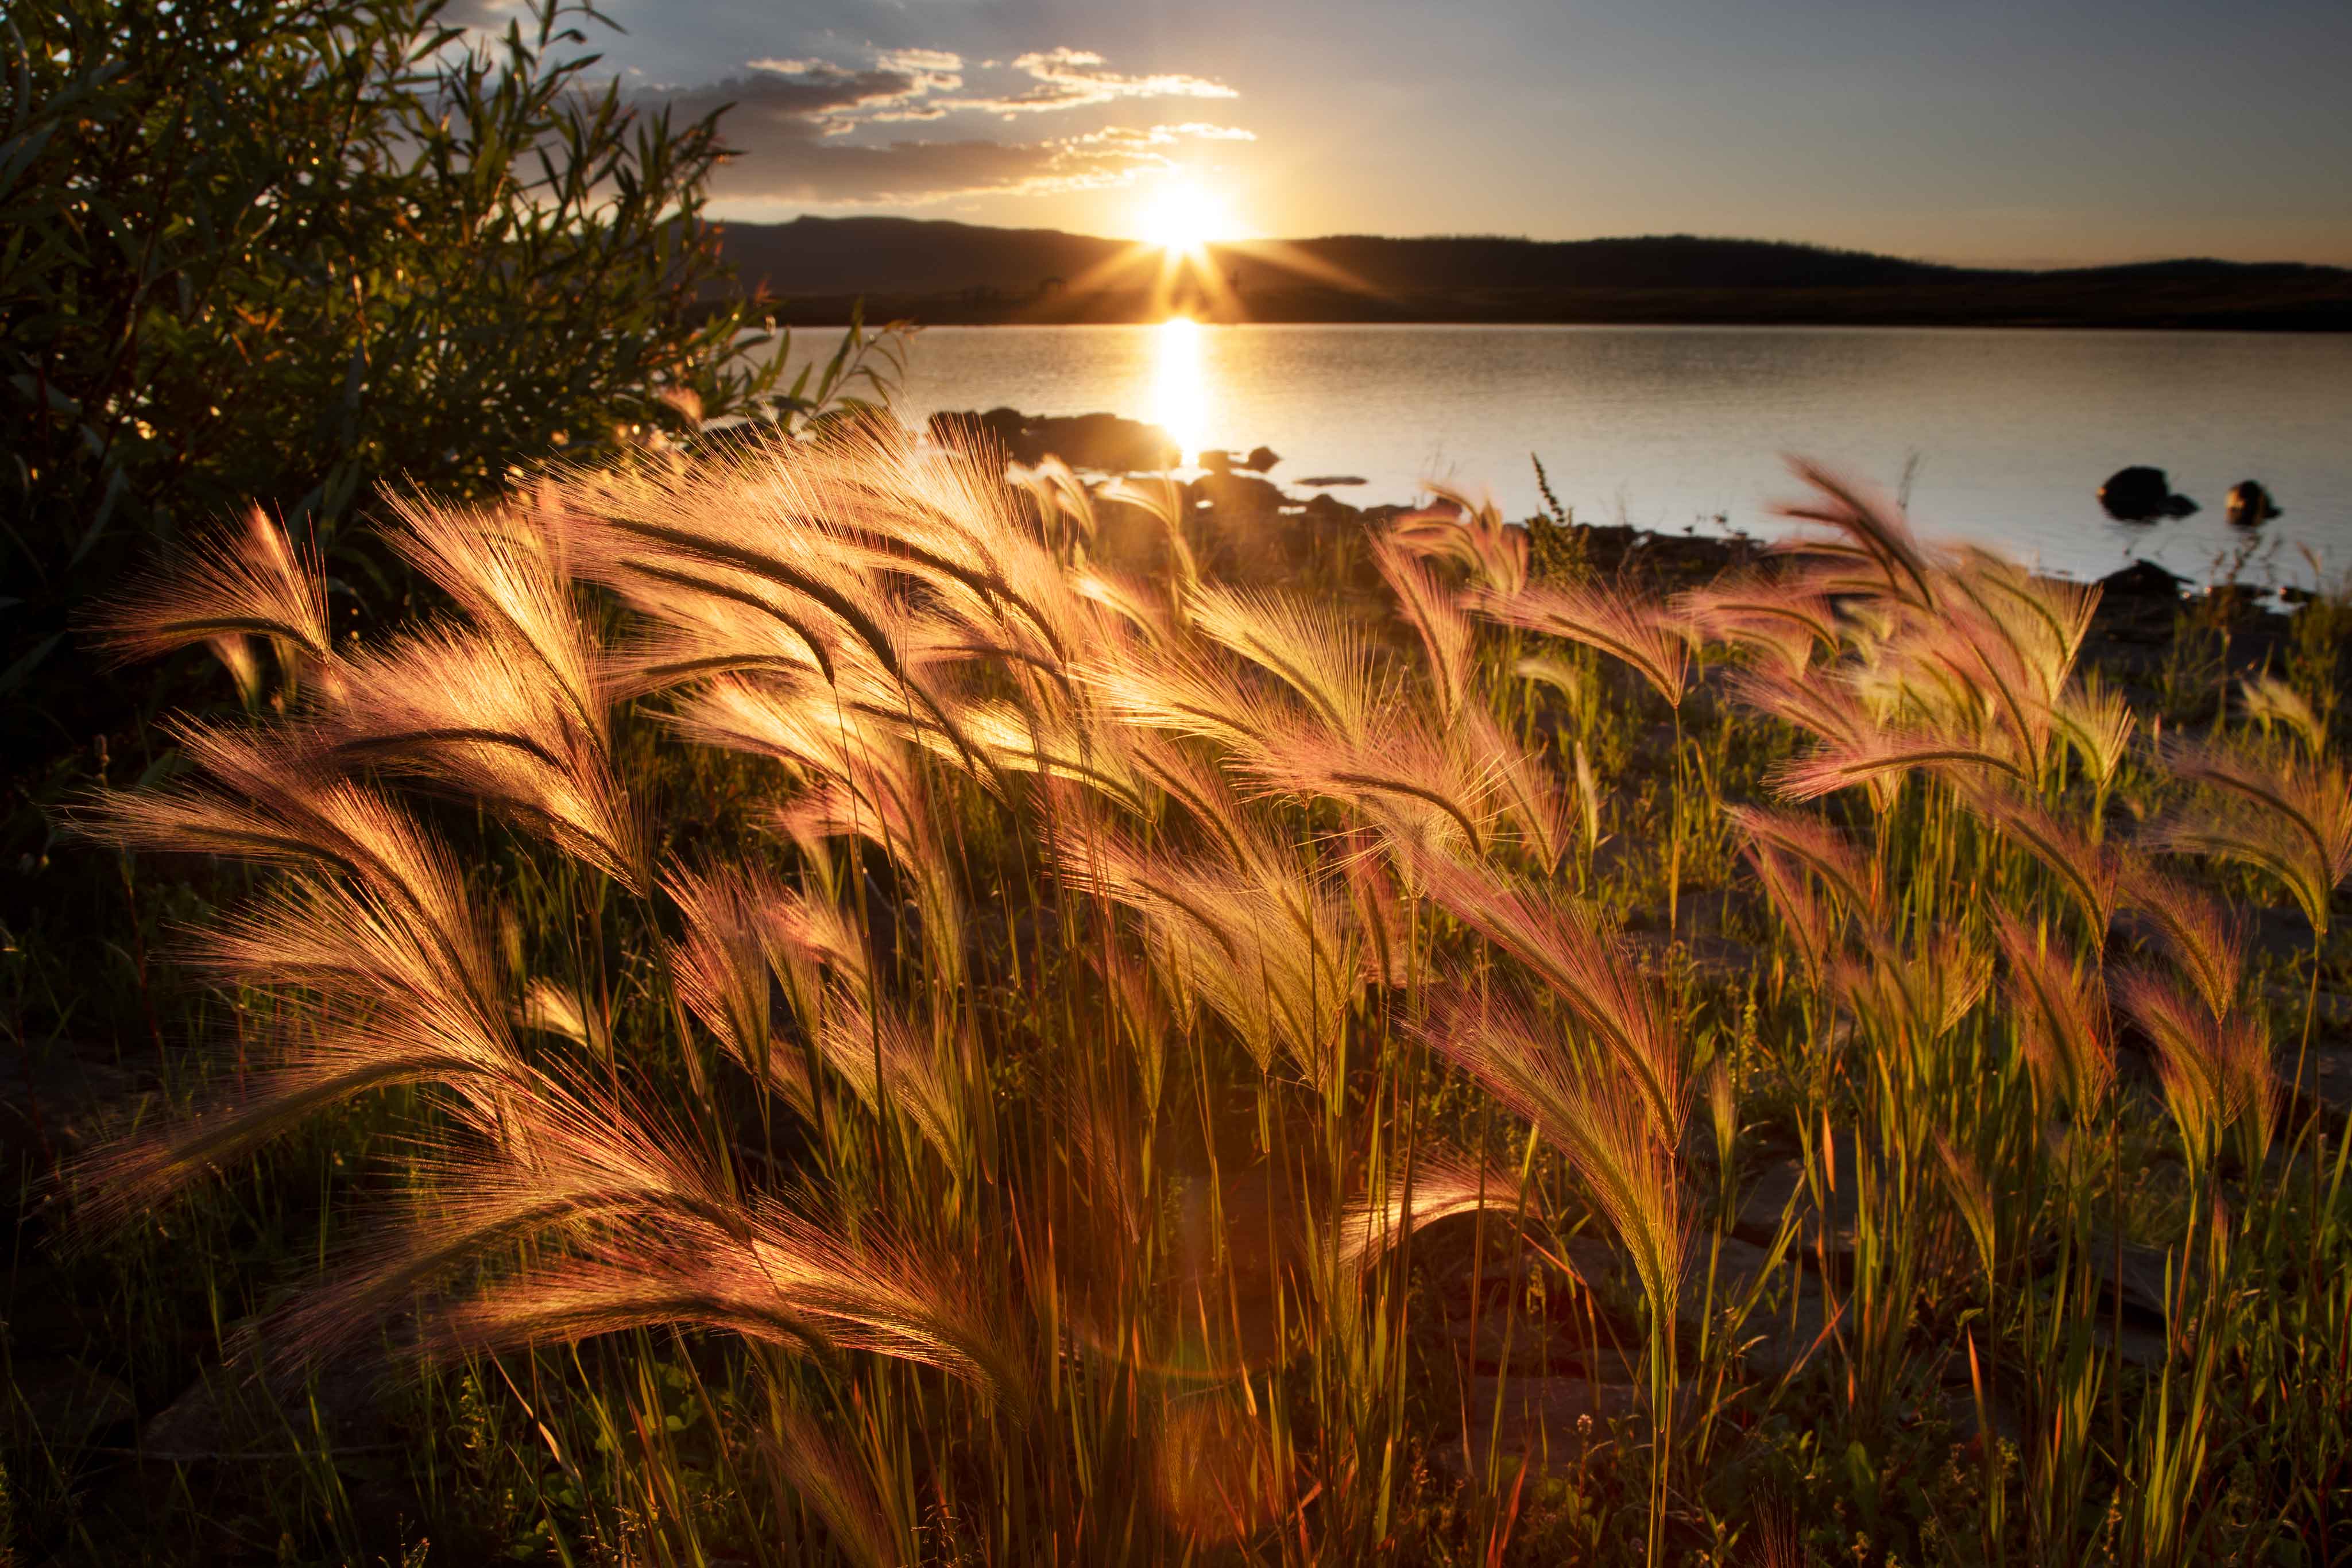 |
Backlighting also causes anything translucent to "glow". In the above photo, the sun shining through thin Foxtails from behind makes their golden tones incredibly vibrant. You can get this effect with all sorts of things, including many trees. Aspen leaves, for example, are quite thin, allowing a certain amount of light to pass through them. Because the leaves are fairly translucent their summer-green or autumn-yellow colors really pop when lit from behind. It's worth noting that objects that are not translucent, but instead solid, can go completely black with extreme backlighting. Again, that's called a silhouette, and a perfect example is the very dark mountain in the photo below (the juniper tree is not a silhouette because its needles are somewhat translucent and I'm also blasting it with a flash). |
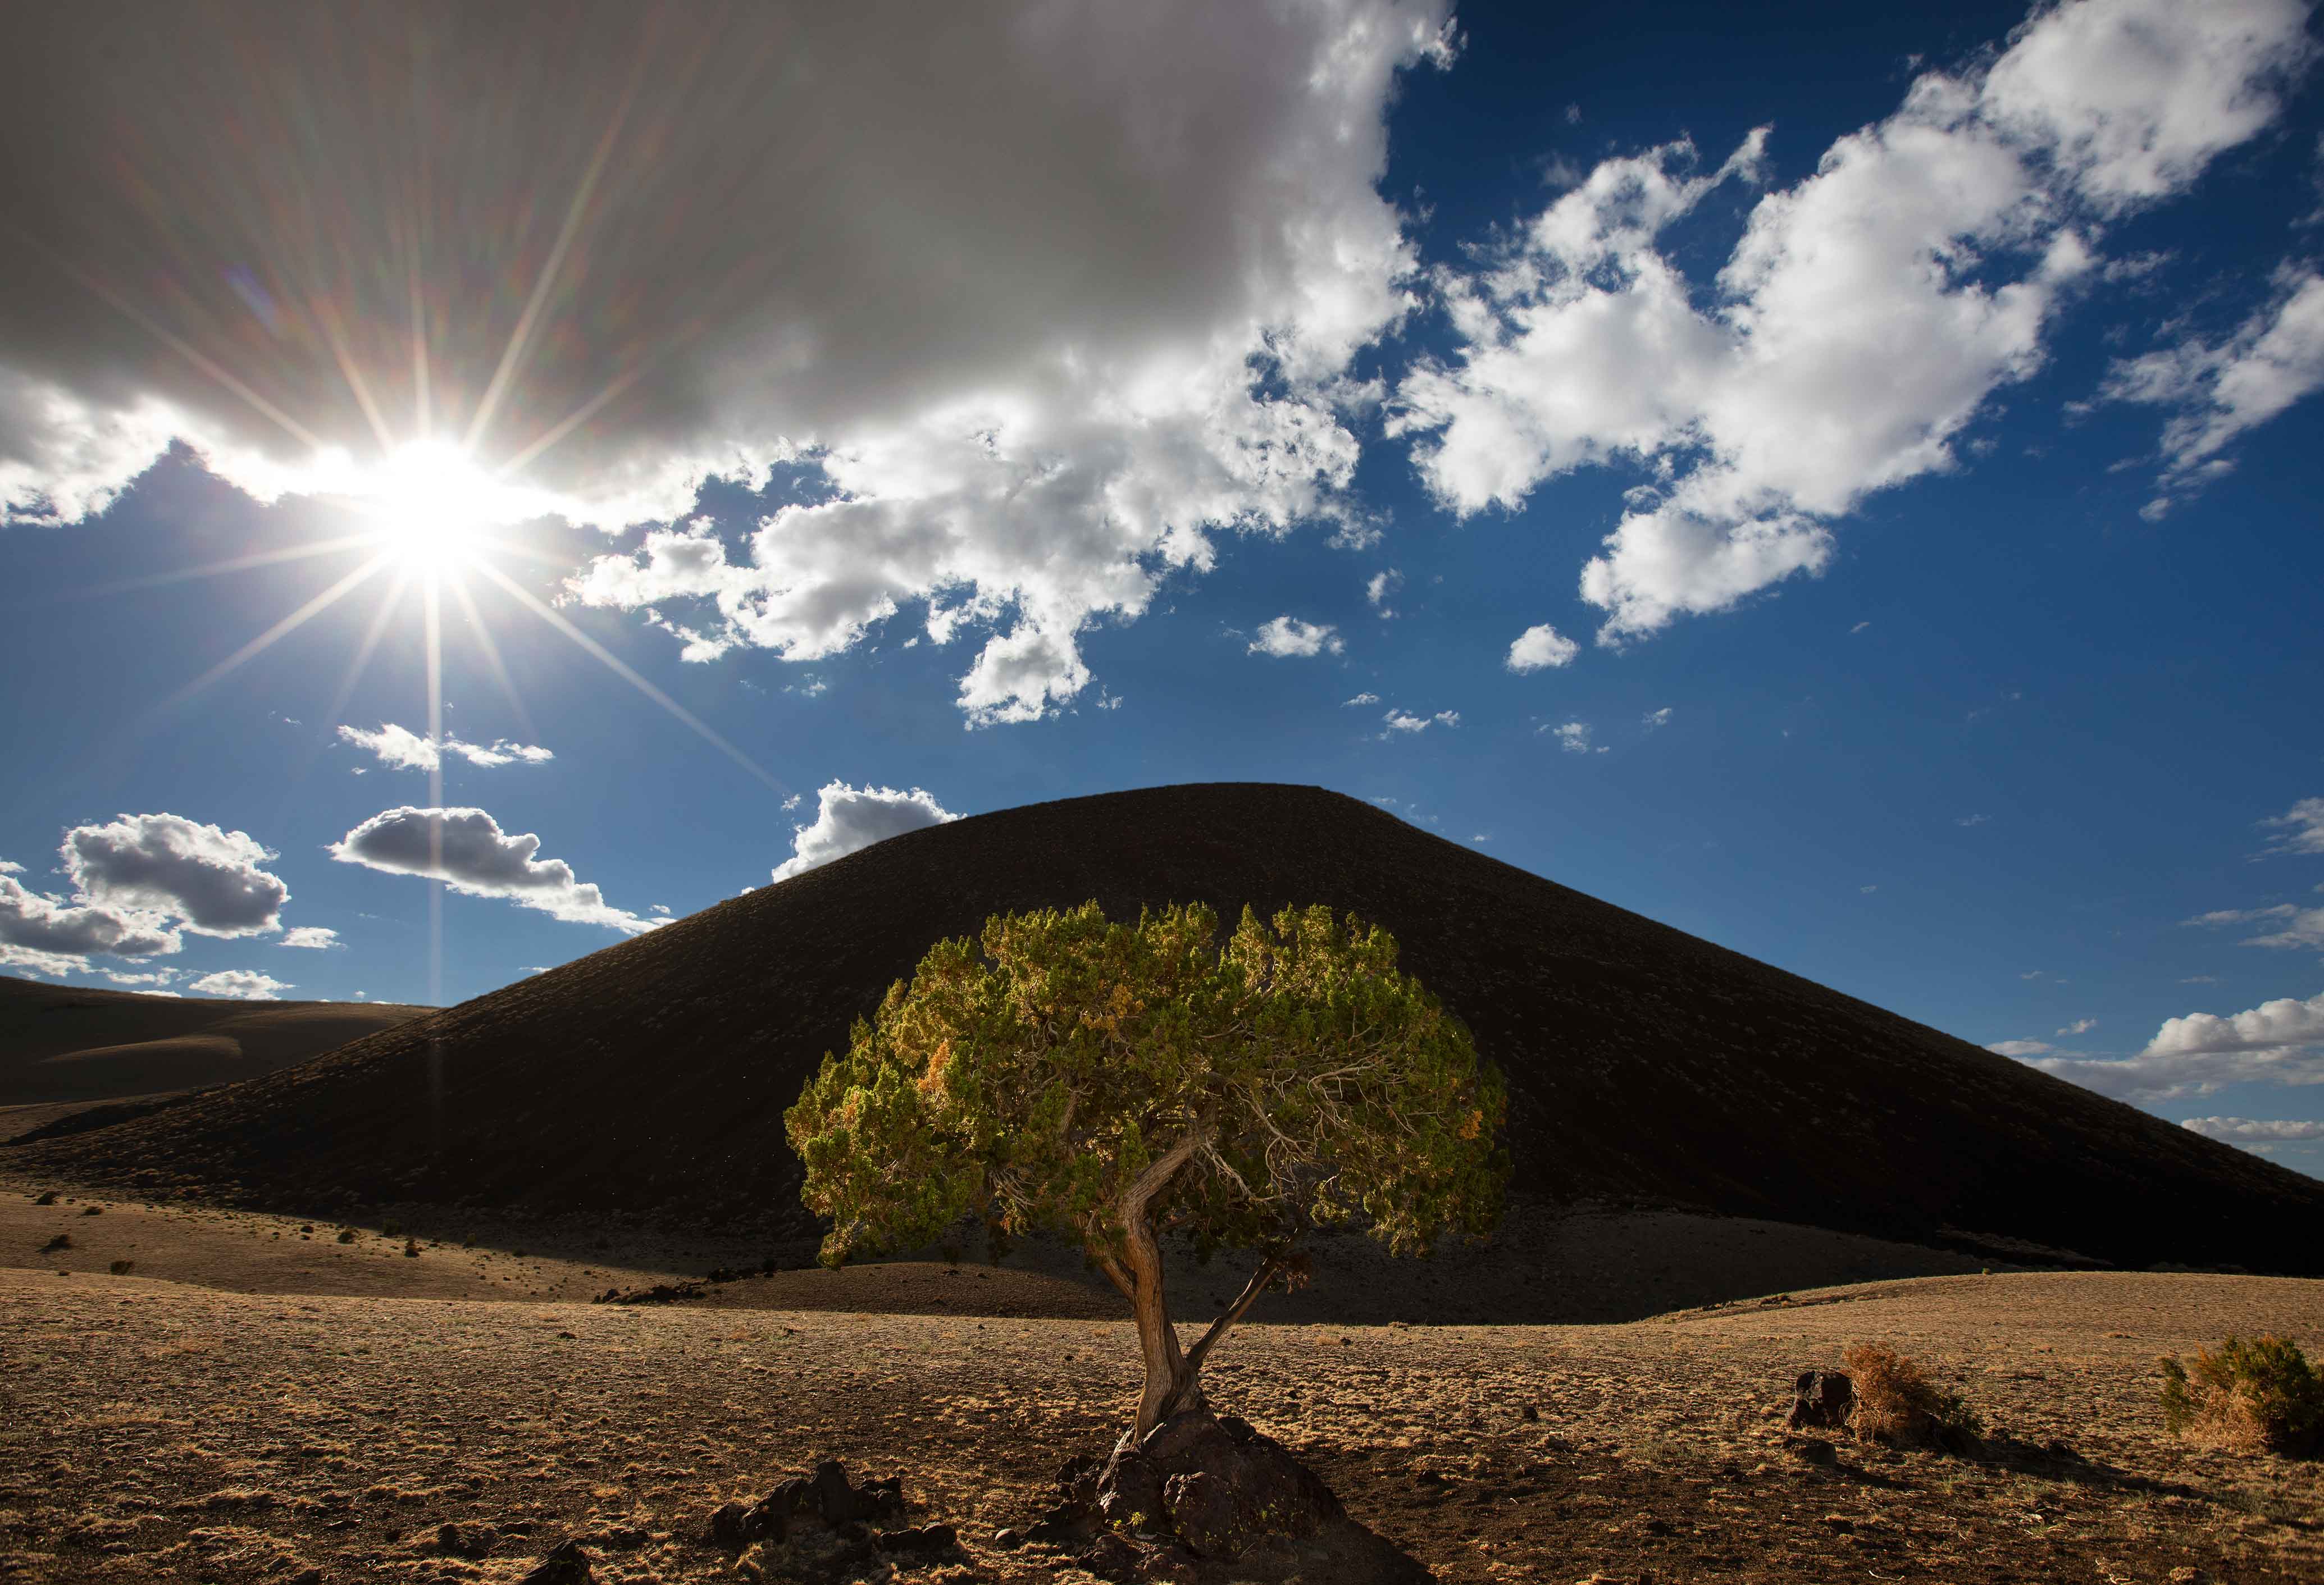 |
Of course, if you shoot into the sun you can also get the sun itself into a photo. This can add a nice touch to a composition, especially if the sun appears to "burst" with long pointy rays of light emanating away from its center. One way to enhance the "sunburst" effect is to capture the sun right on the edge of something. This could be the edge of a tree, the edge of a rock formation, or simply the edge of the horizon as the sun rises or sets. In the example above, the sun is just starting to poke out from behind a cloud, and it is the edge of that cloud that intensifies the "burst" look. I have a theory about how edges magnify sunbursts, but I'm not entirely sure. The only thing I'm certain of is that they do. |
Long Exposures for Flowing Water
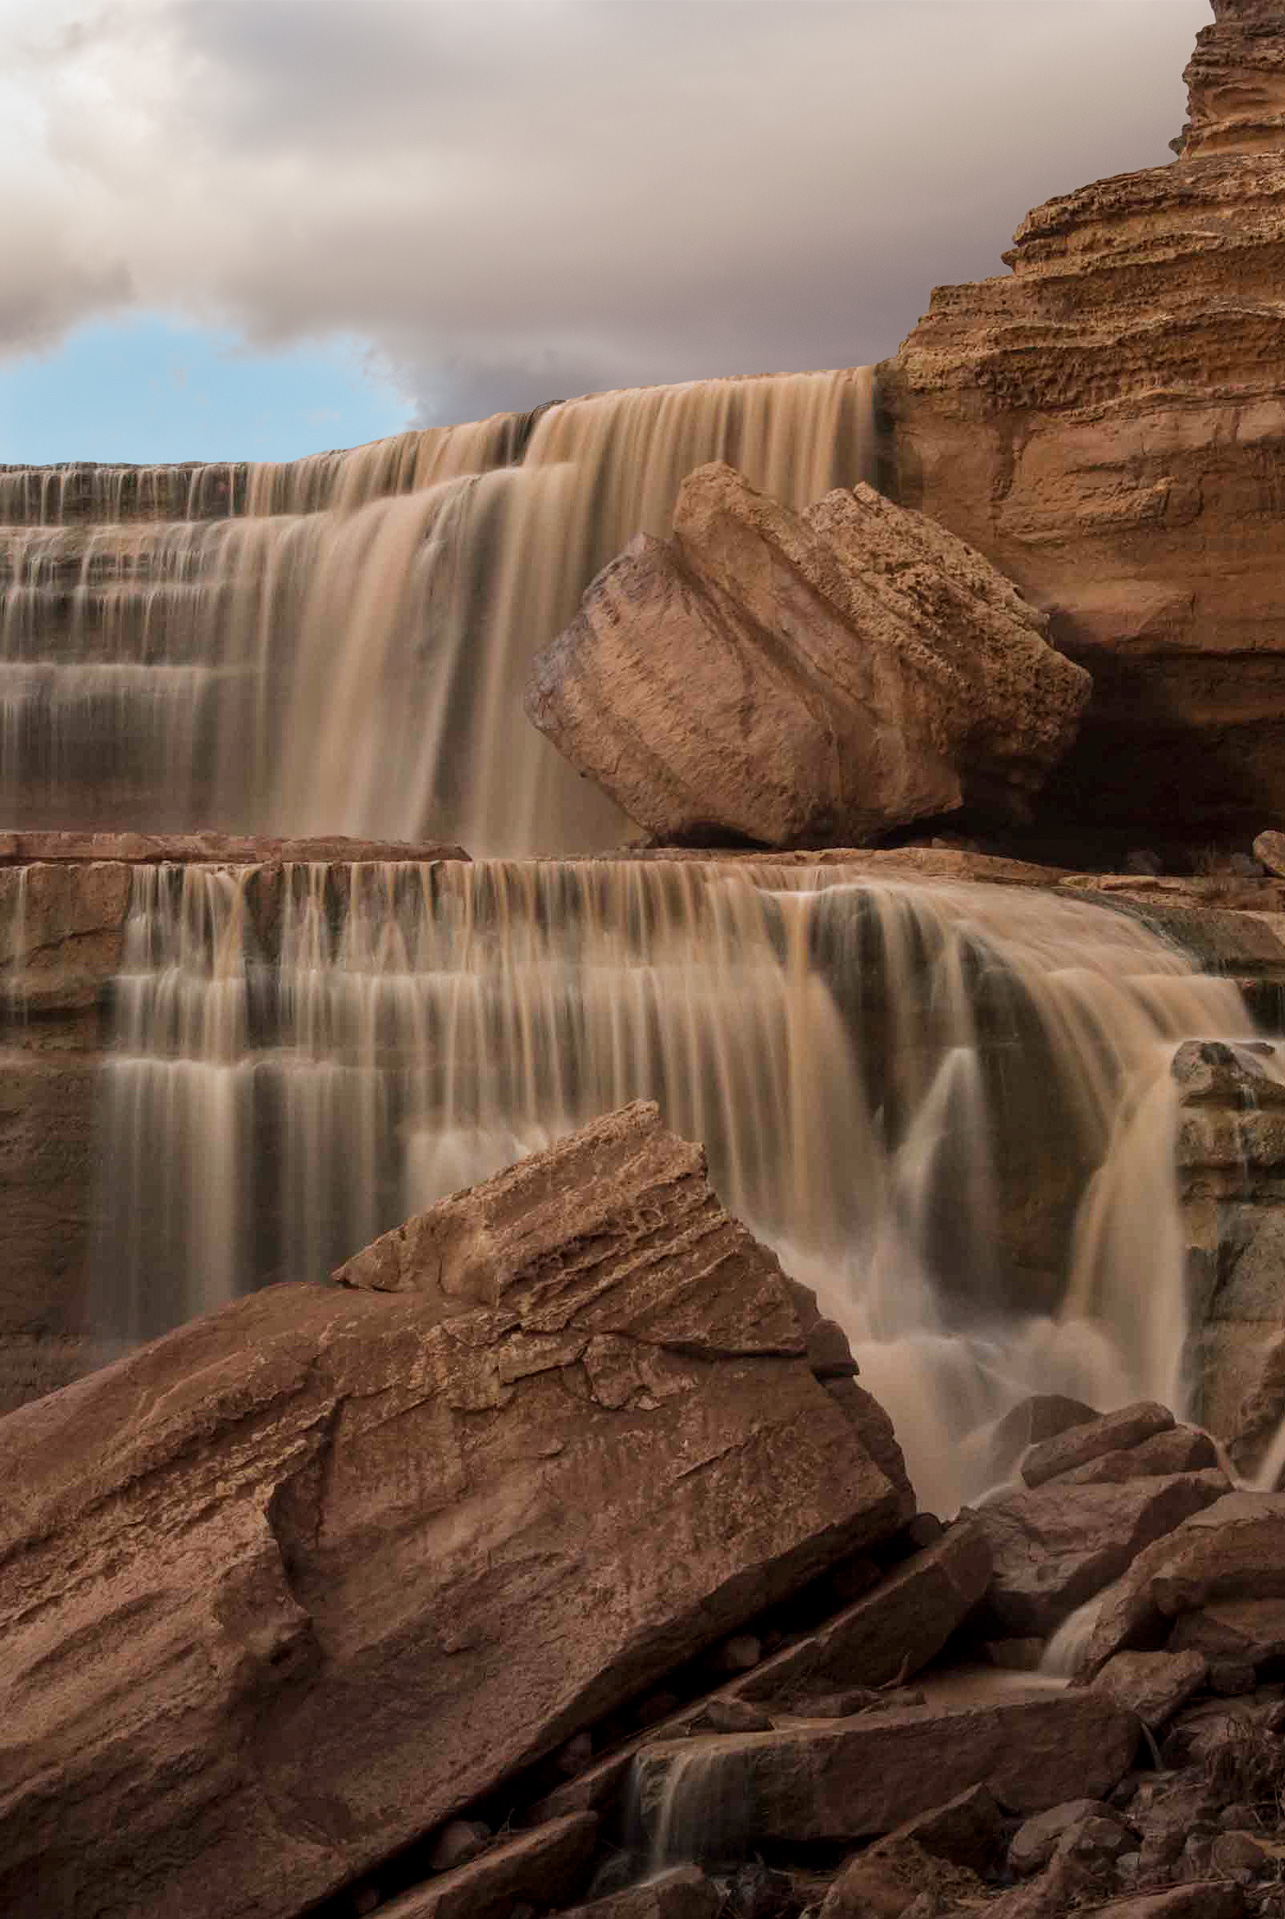 |
To give flowing water a silky smooth look, simply lengthen the shutter speed. The longer the shutter, the smoother the water. Of course, all you're really doing here is intentionally applying copious amounts of motion blur to the water, but if done right the effect can be quite pleasing. If the light isn't dim enough for a long shutter I usually just wait until conditions change. However, you can also increase the shutter speed by using a neutral density filter, which is basically like putting gray sunglasses over your lens to darken the exposure. If you don't have a neutral density filter you can also eat up a stop, or two, or three, of light with a polarizing filter, if you don't mind the image also becoming polarized. However you're able to achieve a long shutter speed, you must use a tripod to stabilize the camera. If the camera moves even a tiny bit during the extended exposure then everything in the entire scene – not just the water – will become blurred. Also, take many photos of the same flowing water. Repeat the exact same shot over, and over, and over. Later, when you're viewing all your "identical" shots on a computer monitor you'll discover they're actually not the same at all. What you cannot see with the naked eye is that creeks, rivers and waterfalls do not simply flow – they ebb and flow. Moving water pulsates, causing it to have a different "shape" at different micro-moments in time. Usually the difference is small but sometimes it's big enough that some images of the water turn out significantly more interesting than others, and you'll appreciate the opportunity to select from several photos in order to keep the very best one. Similarly, you may also want to shoot flowing water with a normal shutter speed as well as with a long one. Not every creek or waterfall looks best all smooth and silky. It's an artistic choice, and there will be times when "freezing" the water with a faster shutter produces a result you like better. Or, both ways may turn out great, just different. |
Patterns to Infinity
 |
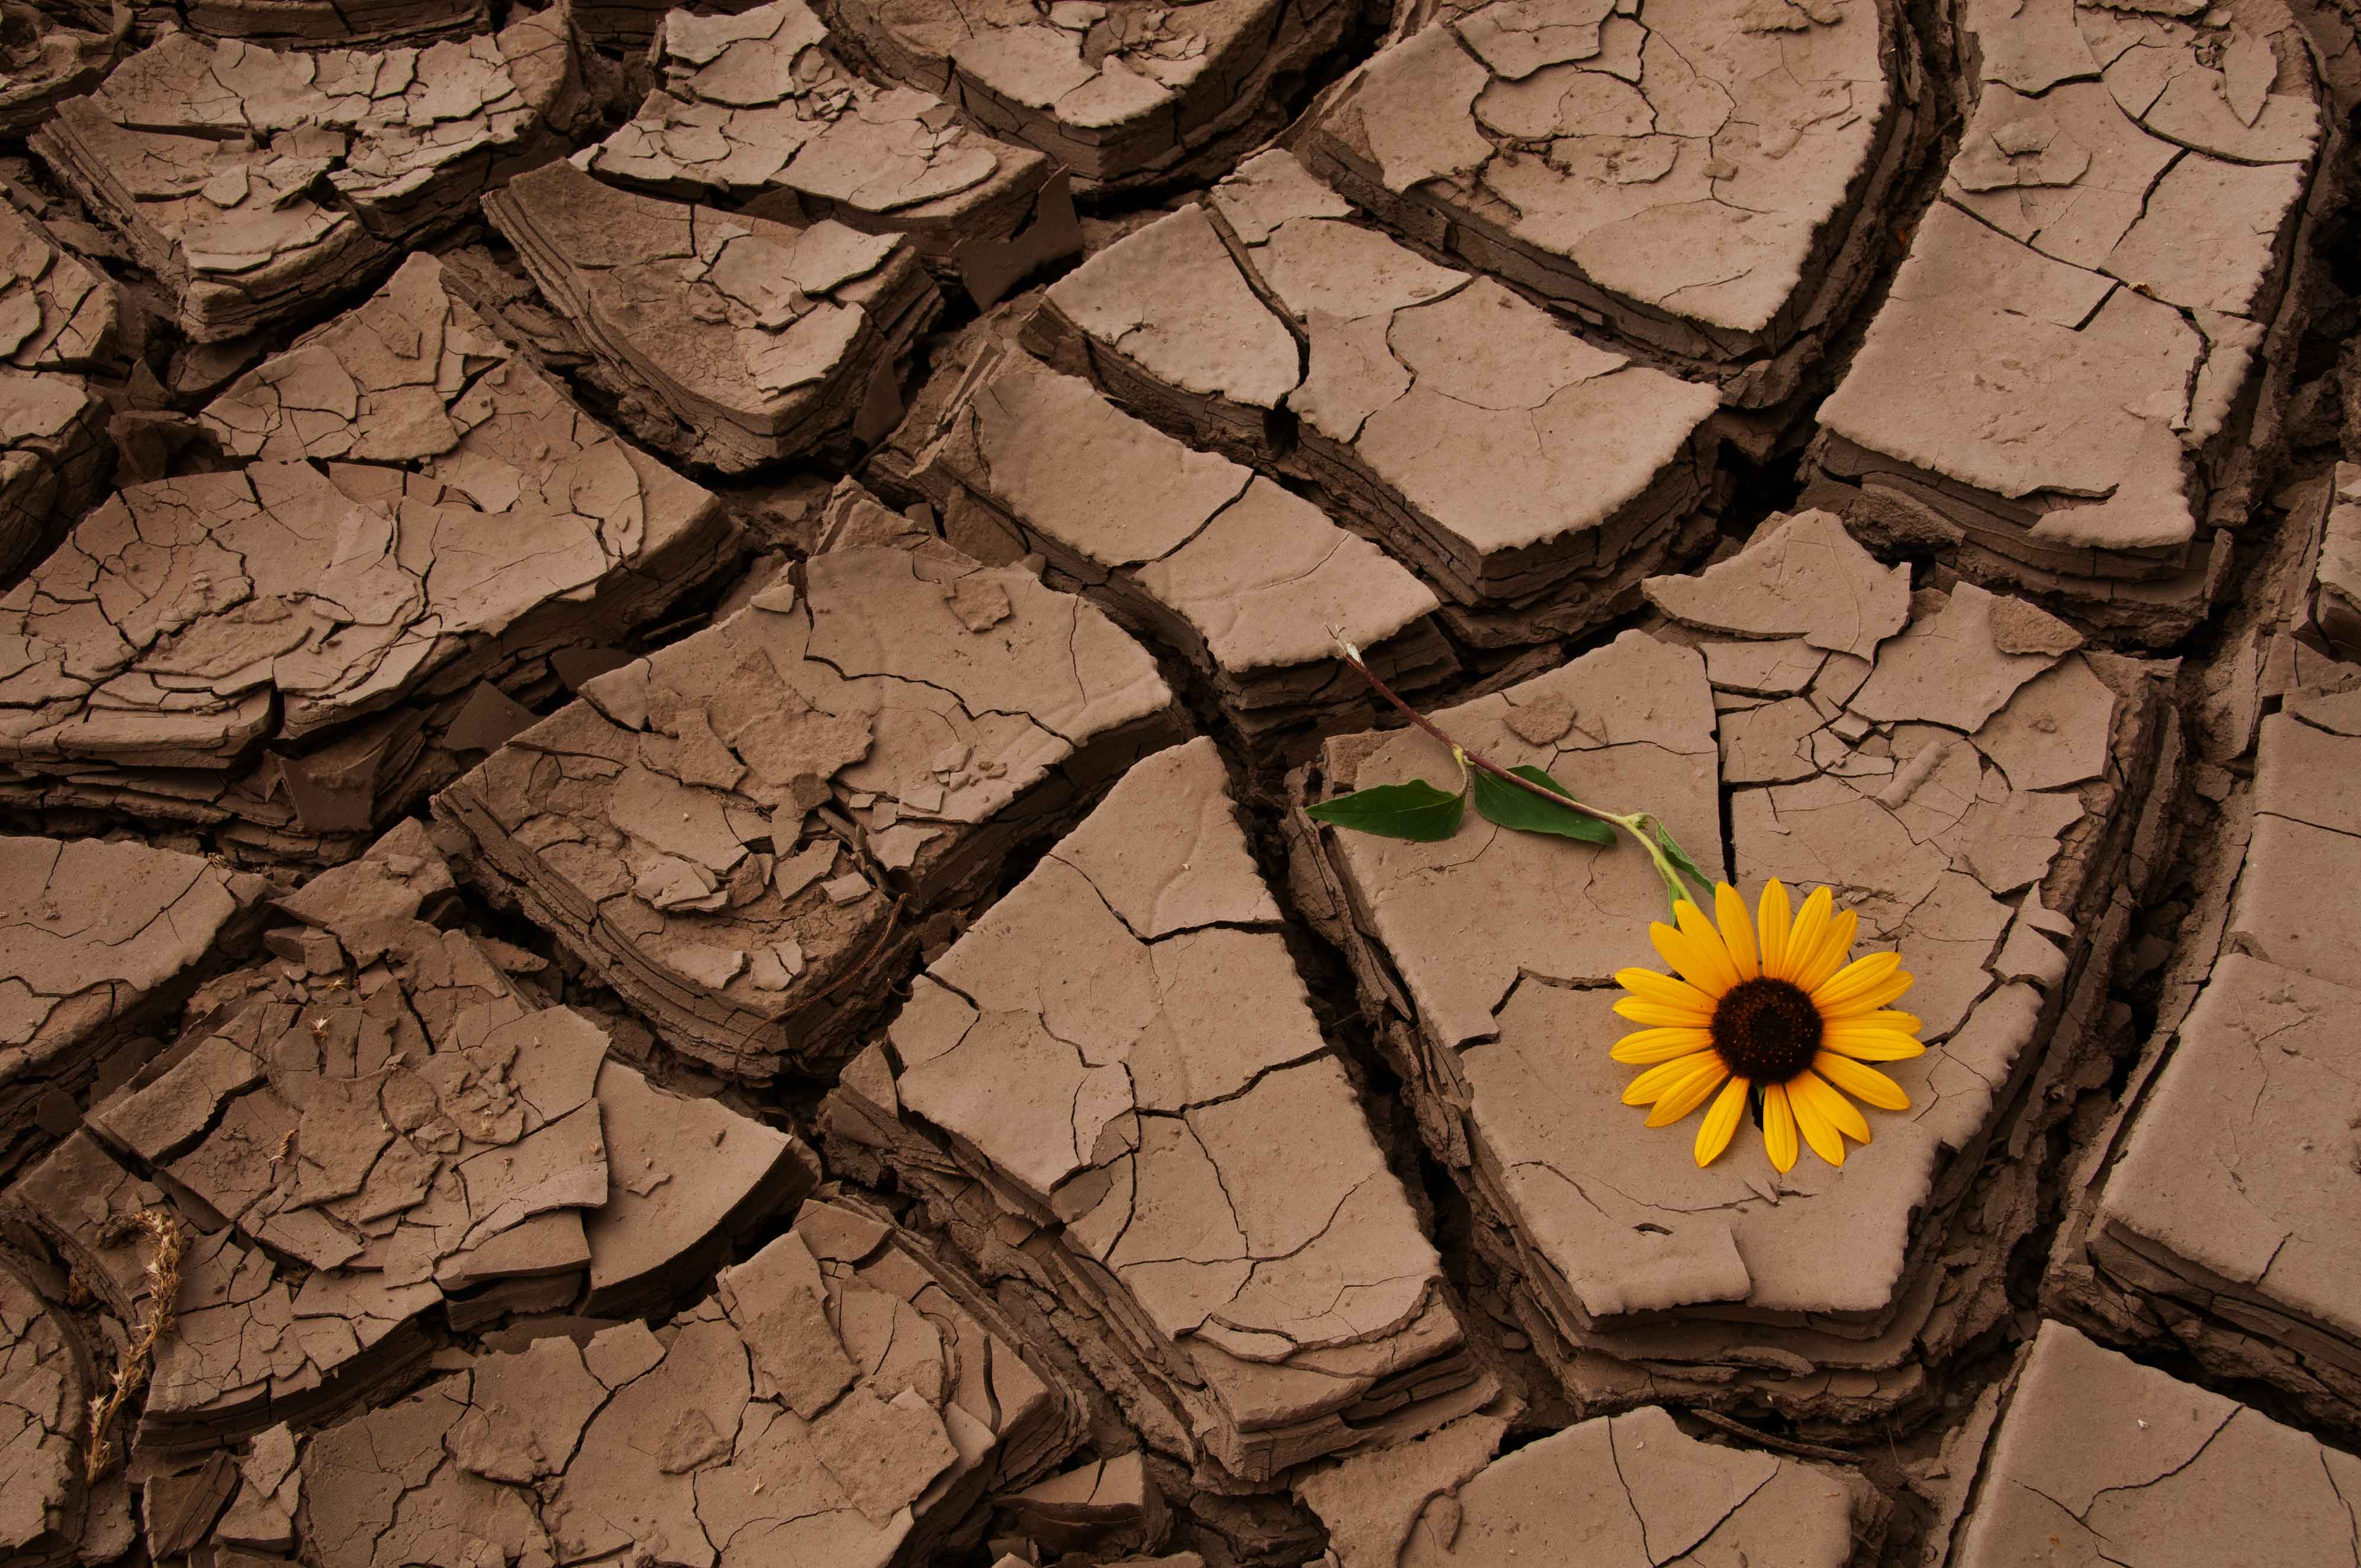 |
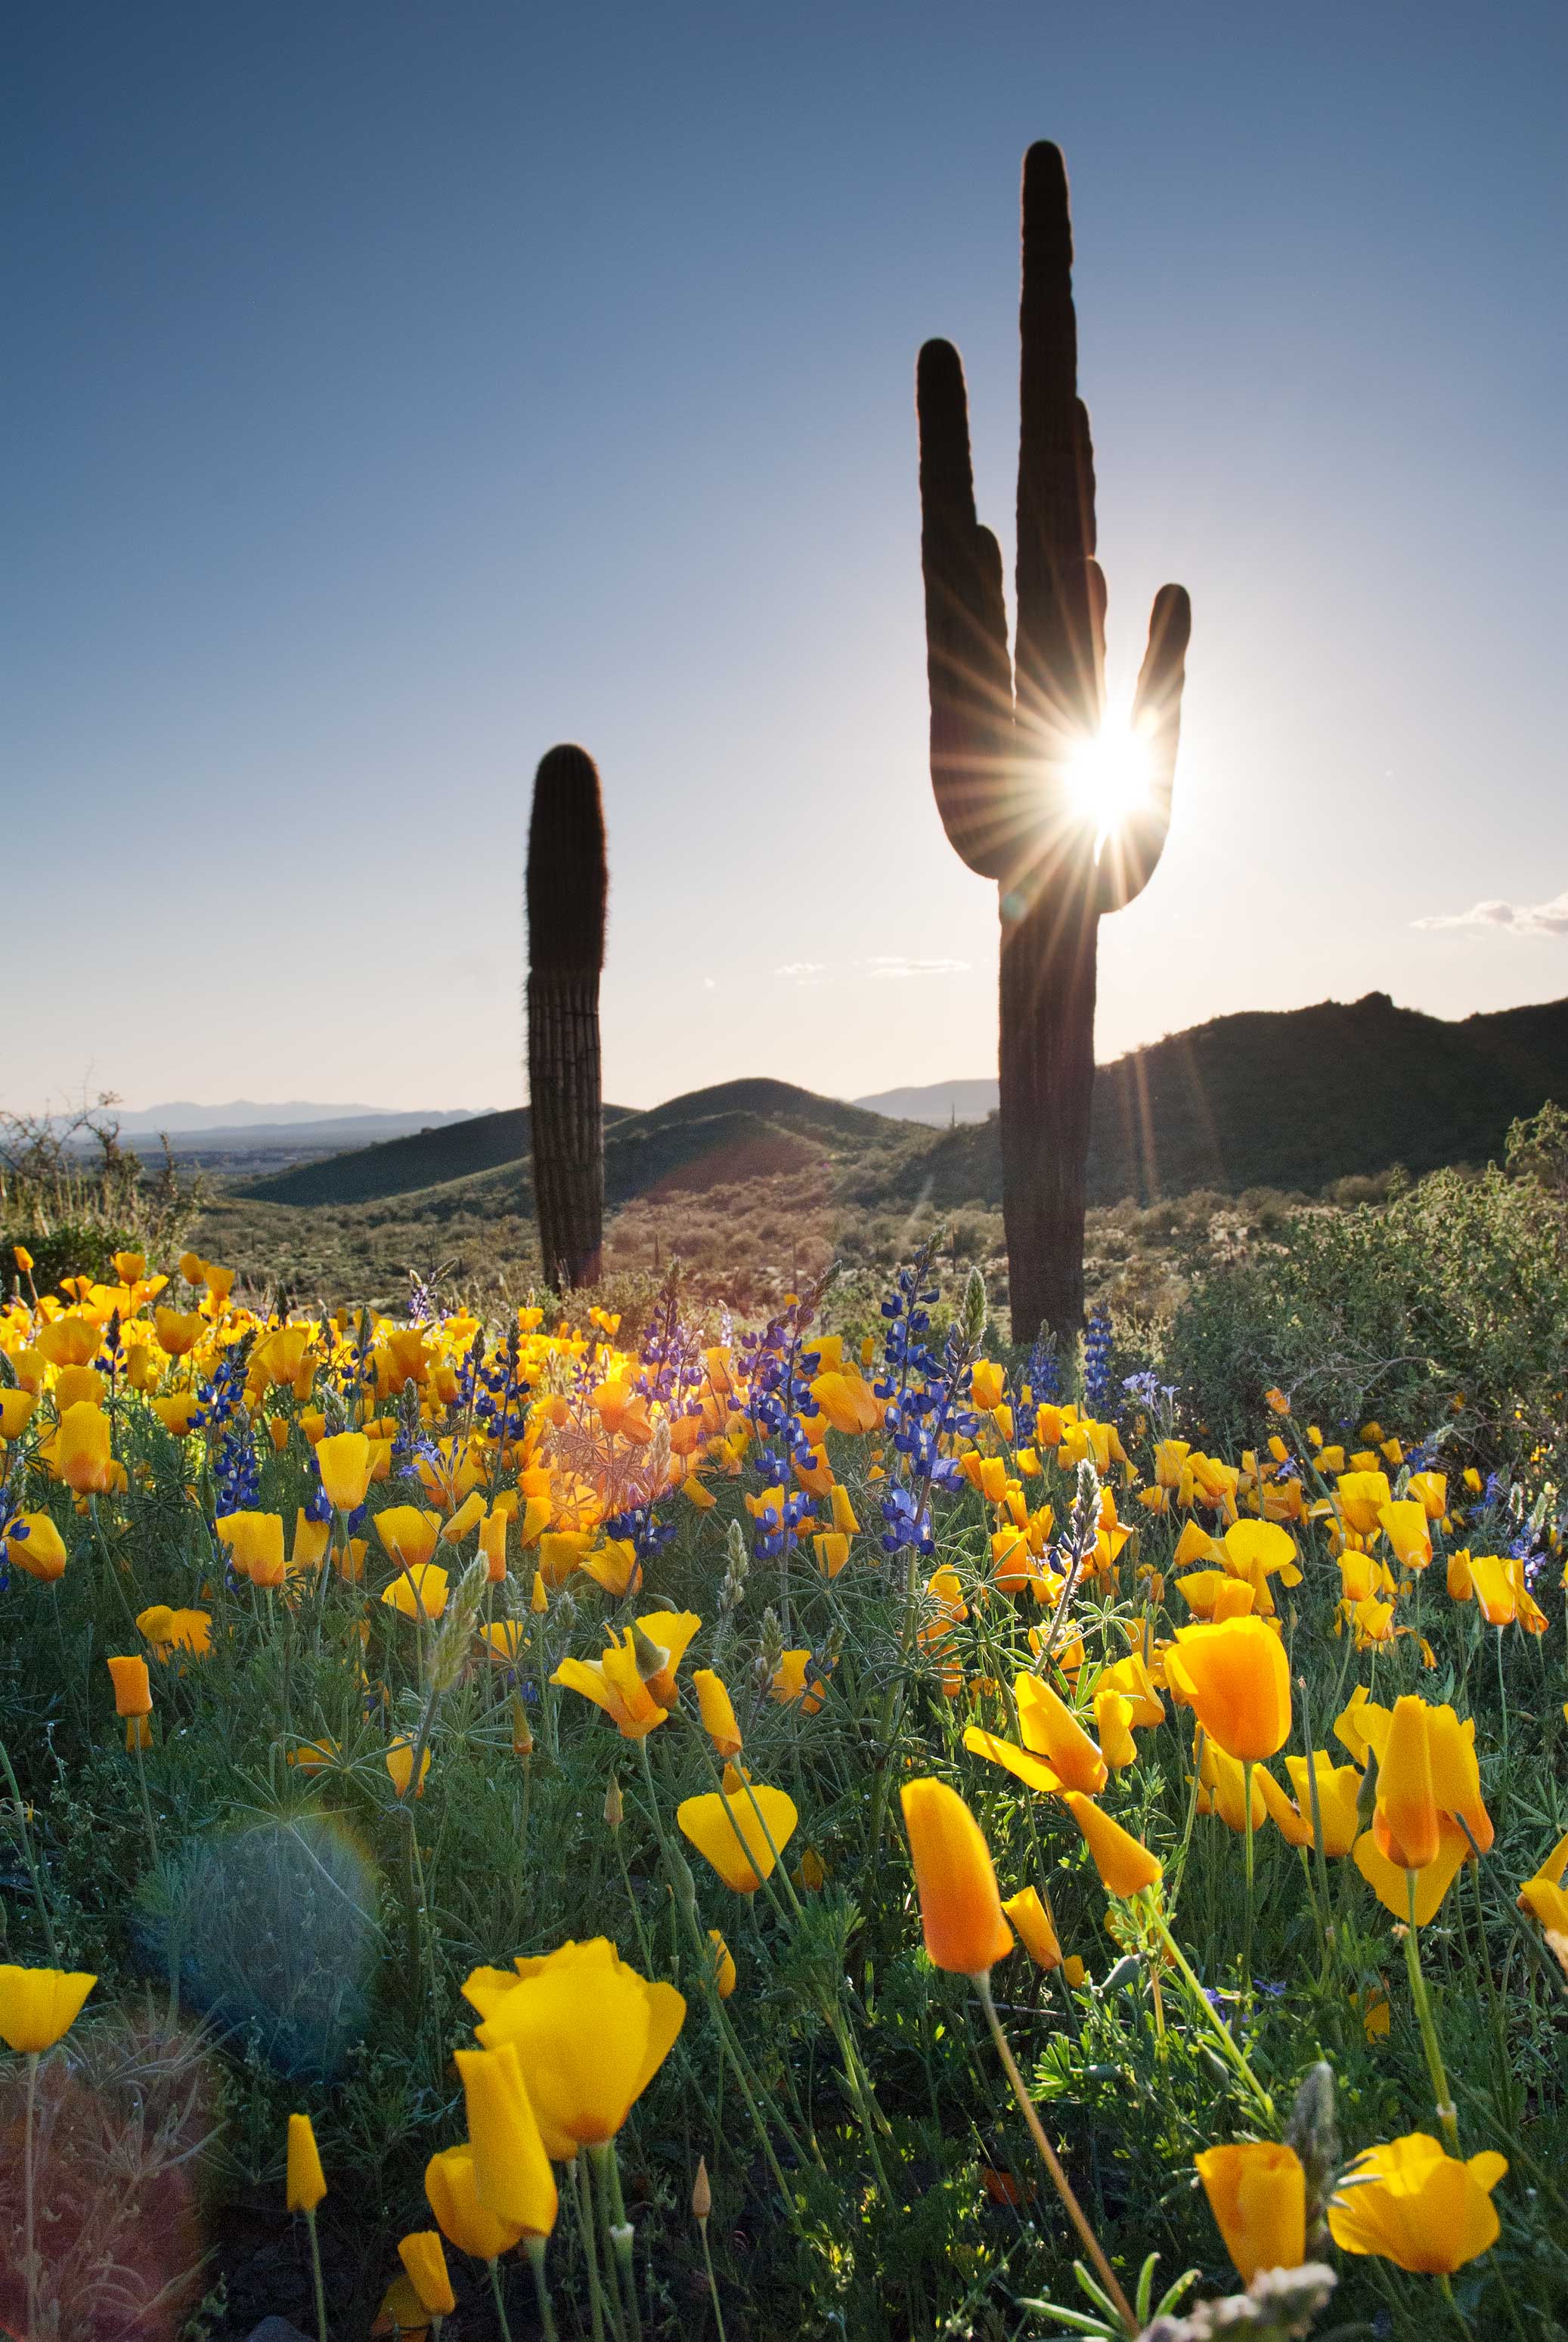
This one actually falls under the category of composition, but I use "pattern to infinity" often enough that I'm also calling it one of my Special Techniques. Simply put, I sometimes zoom in so closely on a pattern that it runs off the edges of the photograph. This suggests to viewers that the pattern continues indefinitely, perhaps for a very long distance. For example, when people look at the upper-left photo they often assume the field of poppies is huge when it fact it pretty much disappears just beyond the left and right edges of the image. In the upper-right photo, the area of dry ground is only five or six feet wide. Beyond that the cracks mostly disappear and are replaced by grass. However, by framing that small dried-up area tightly I imply that perhaps the whole region is stricken by drought, something that makes the lone sunflower appear all the more resilient.
|
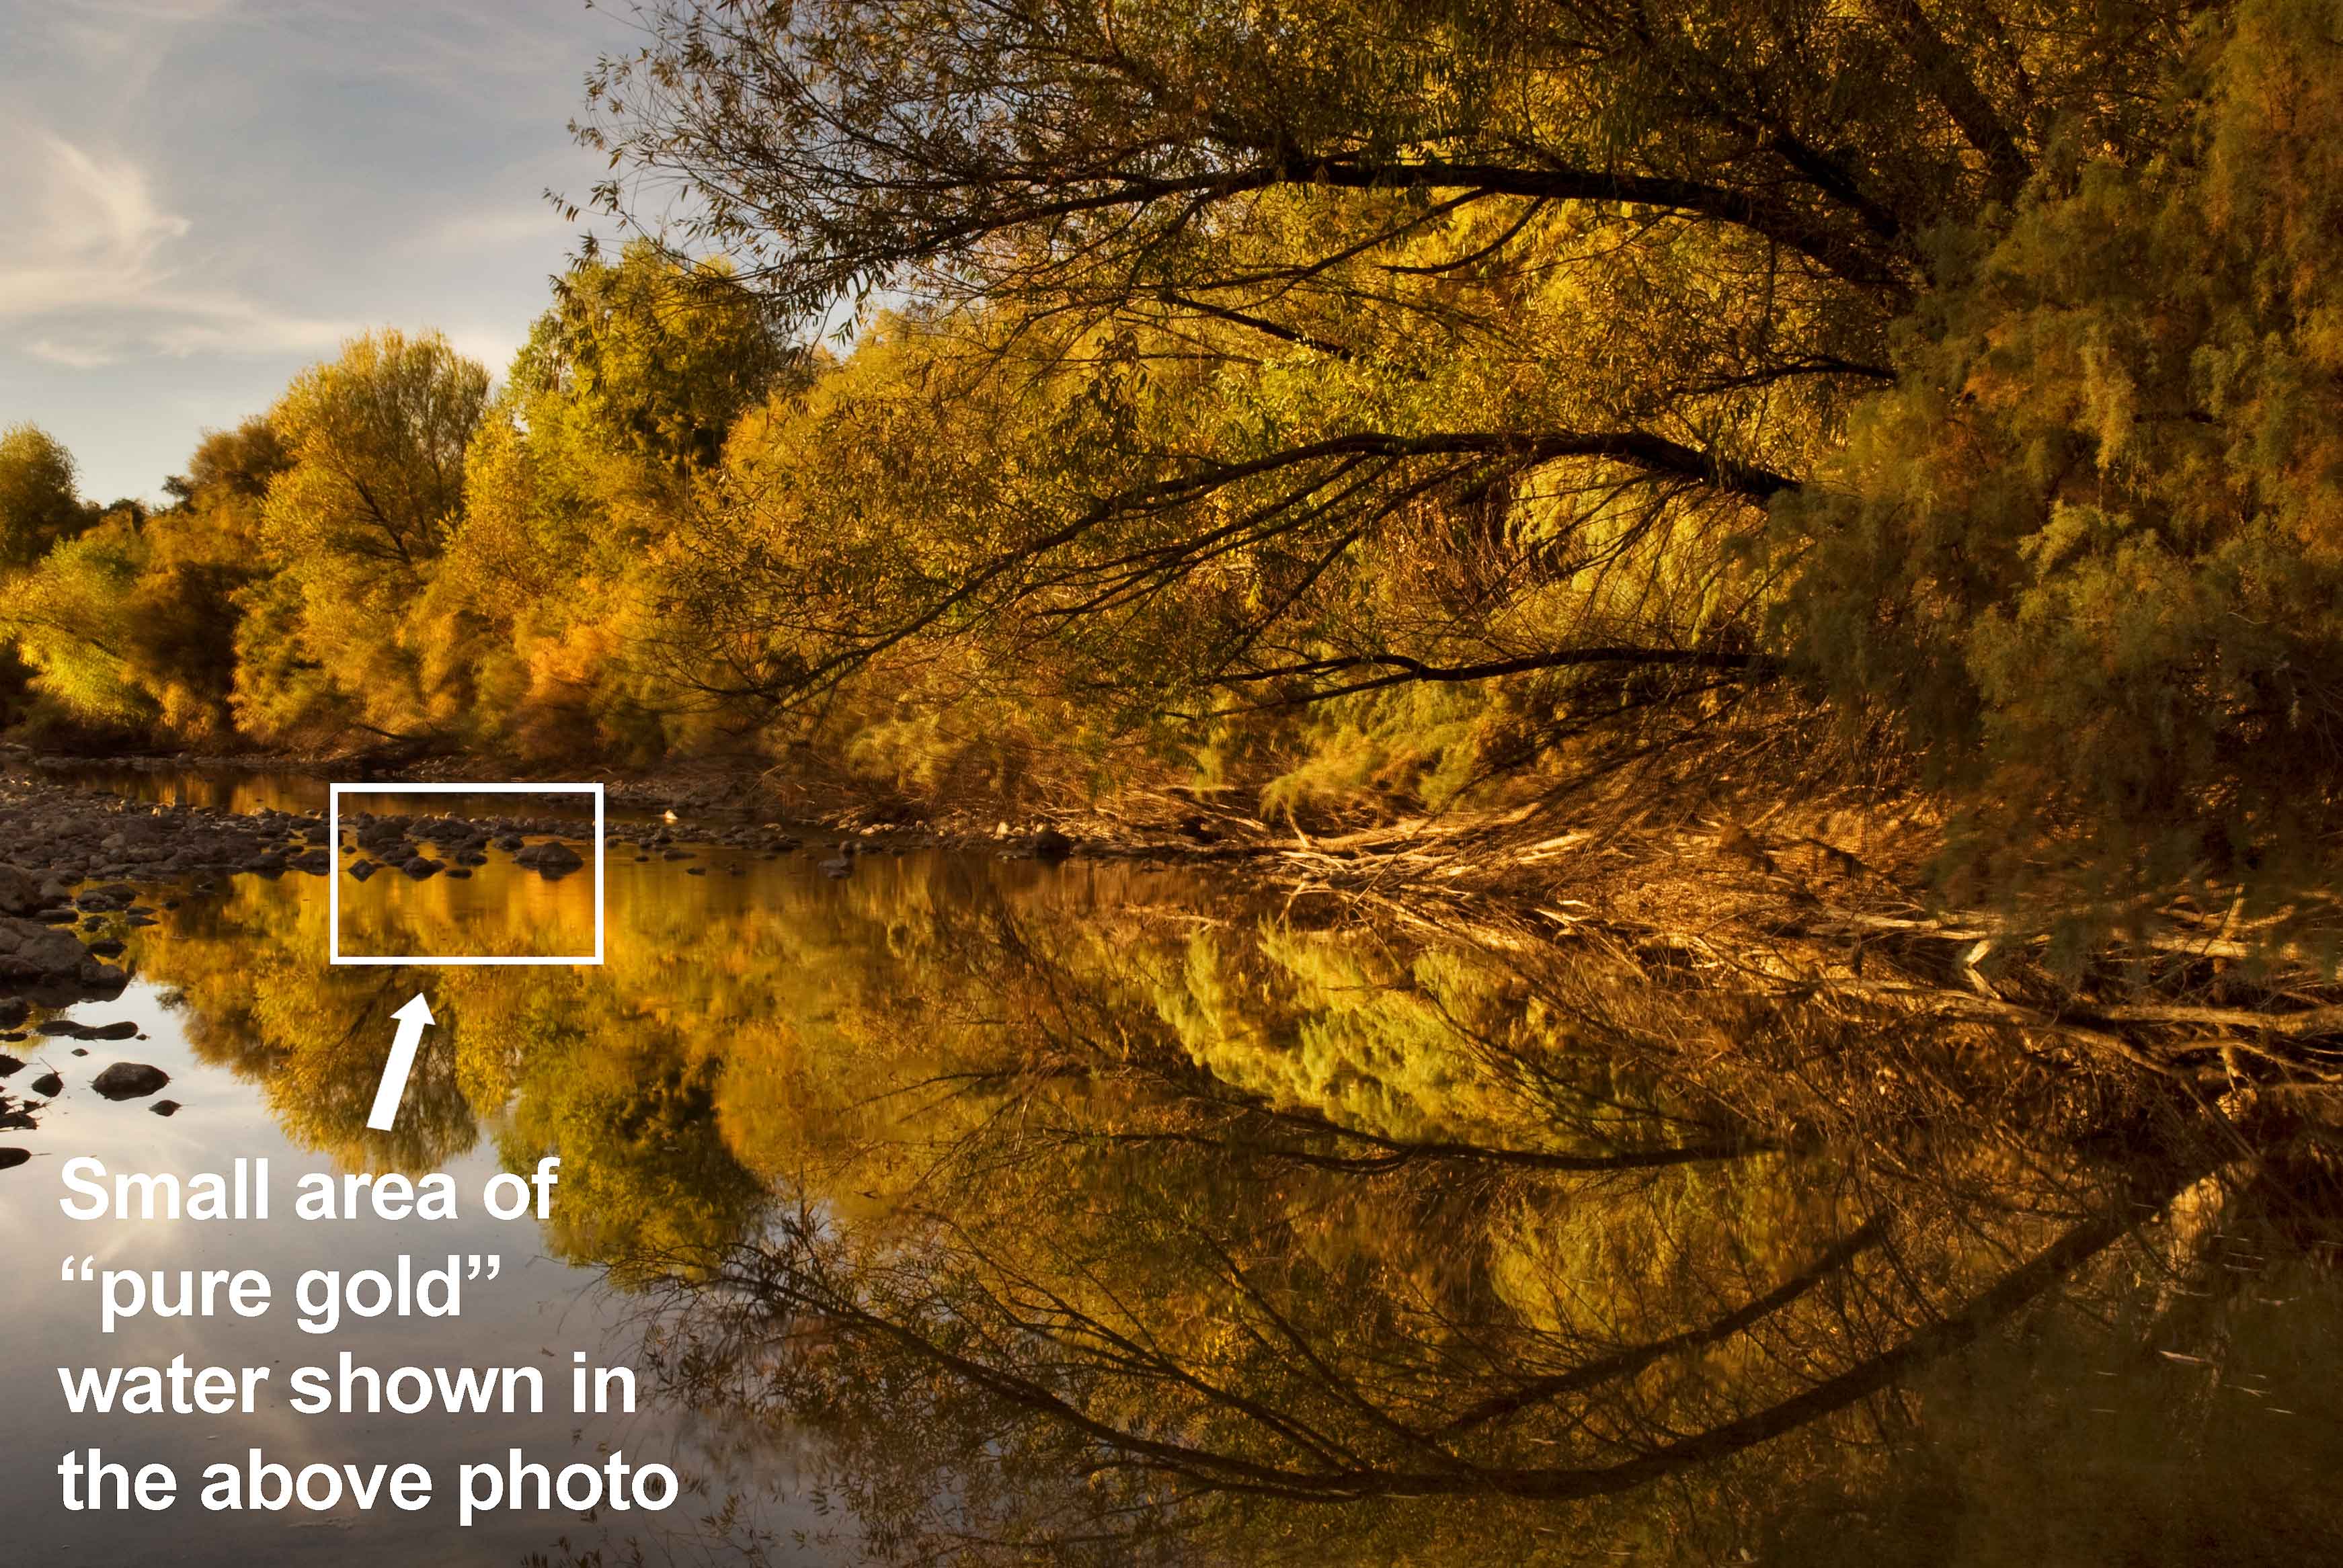
Dramatic (But Natural) Reflections
Nothing spices up a photo like a shimmering reflection. Trees, mountains, rock formations – even clouds and sunsets – can appear in water. However, for reflections to appear with any amount of clarity the water must be still, which in turn means the air must be still. The more calm the conditions, the more vivid the reflections. I'm not sure about other parts of the country, but in Arizona wind often subsides at twilight. This of course is not always the case, but I notice that breezy days frequently taper down as soon as the sun falls beneath the horizon, making it one of the best times to capture awesome "mirror images" on the water. Also, just as long shutter speeds can smoothen out waterfalls, so can they smoothen out ripples on pools of water. Therefore, if conditions are not completely calm, you can make the water appear more "glassy" by extending the shutter. If you're shooting at twilight this should be easy since there won't be much light to begin with. Most of my reflection photos are all about symmetry. However, if you frame a reflection very tightly you can also get a "pattern to infinity" effect. Consider the two photos below. The one with trees is an example of a traditional symmetrical reflection. To create the other photo I zoomed in very tightly on a small part of the overall reflecting area. By allowing the reflection to run off the edges of the photo I suggest that perhaps the entire river is flowing with liquid gold, when of course it is not. This effect can be so striking that other people sometimes do not believe the color of the water is real. I can't tell you how many times I've been accused of Photoshopping reflections onto water when in fact they're completely natural. |
 |
 |
HDR
Sometimes the range of light across a scene is so great that it cannot be captured in a single exposure. In the photos below, the sky is far brighter than the ground. I could properly expose for one or the other, but not both in the same take. One way to deal with this very common dilemma is to create multiple exposures of the same scene, then merge them later in Photoshop. Any number of exposures may be combined, although in most cases two seems to do the trick. HDR (High Dynamic Range), as this technique is called, has become very common, especially with landscape photographers who often shoot very big places under naturally uneven light. And contrary to what some people think, HDR is not "cheating". HDR does not artificially add or enhance colors in a photo, it simply preserves colors that are already there. If vibrant colors don't naturally exist in a landscape to begin with, HDR cannot make them magically appear. |
 Exposure #1 The ground is properly exposed, but the sky is overexposed to the point of being almost completely white. |
 Exposure #2 The sky is properly exposed, but the ground is underexposed to the point of being almost cmpletely black. |
|||
 Exposures #1 and #2 Combined The two images above are merged in Photoshop to create a proper exposure across the entire scene. In this way, all of the colors that naturally occur in both the land and sky are preserved. |
||||
Combining Multiple Techniques |
|||||
|
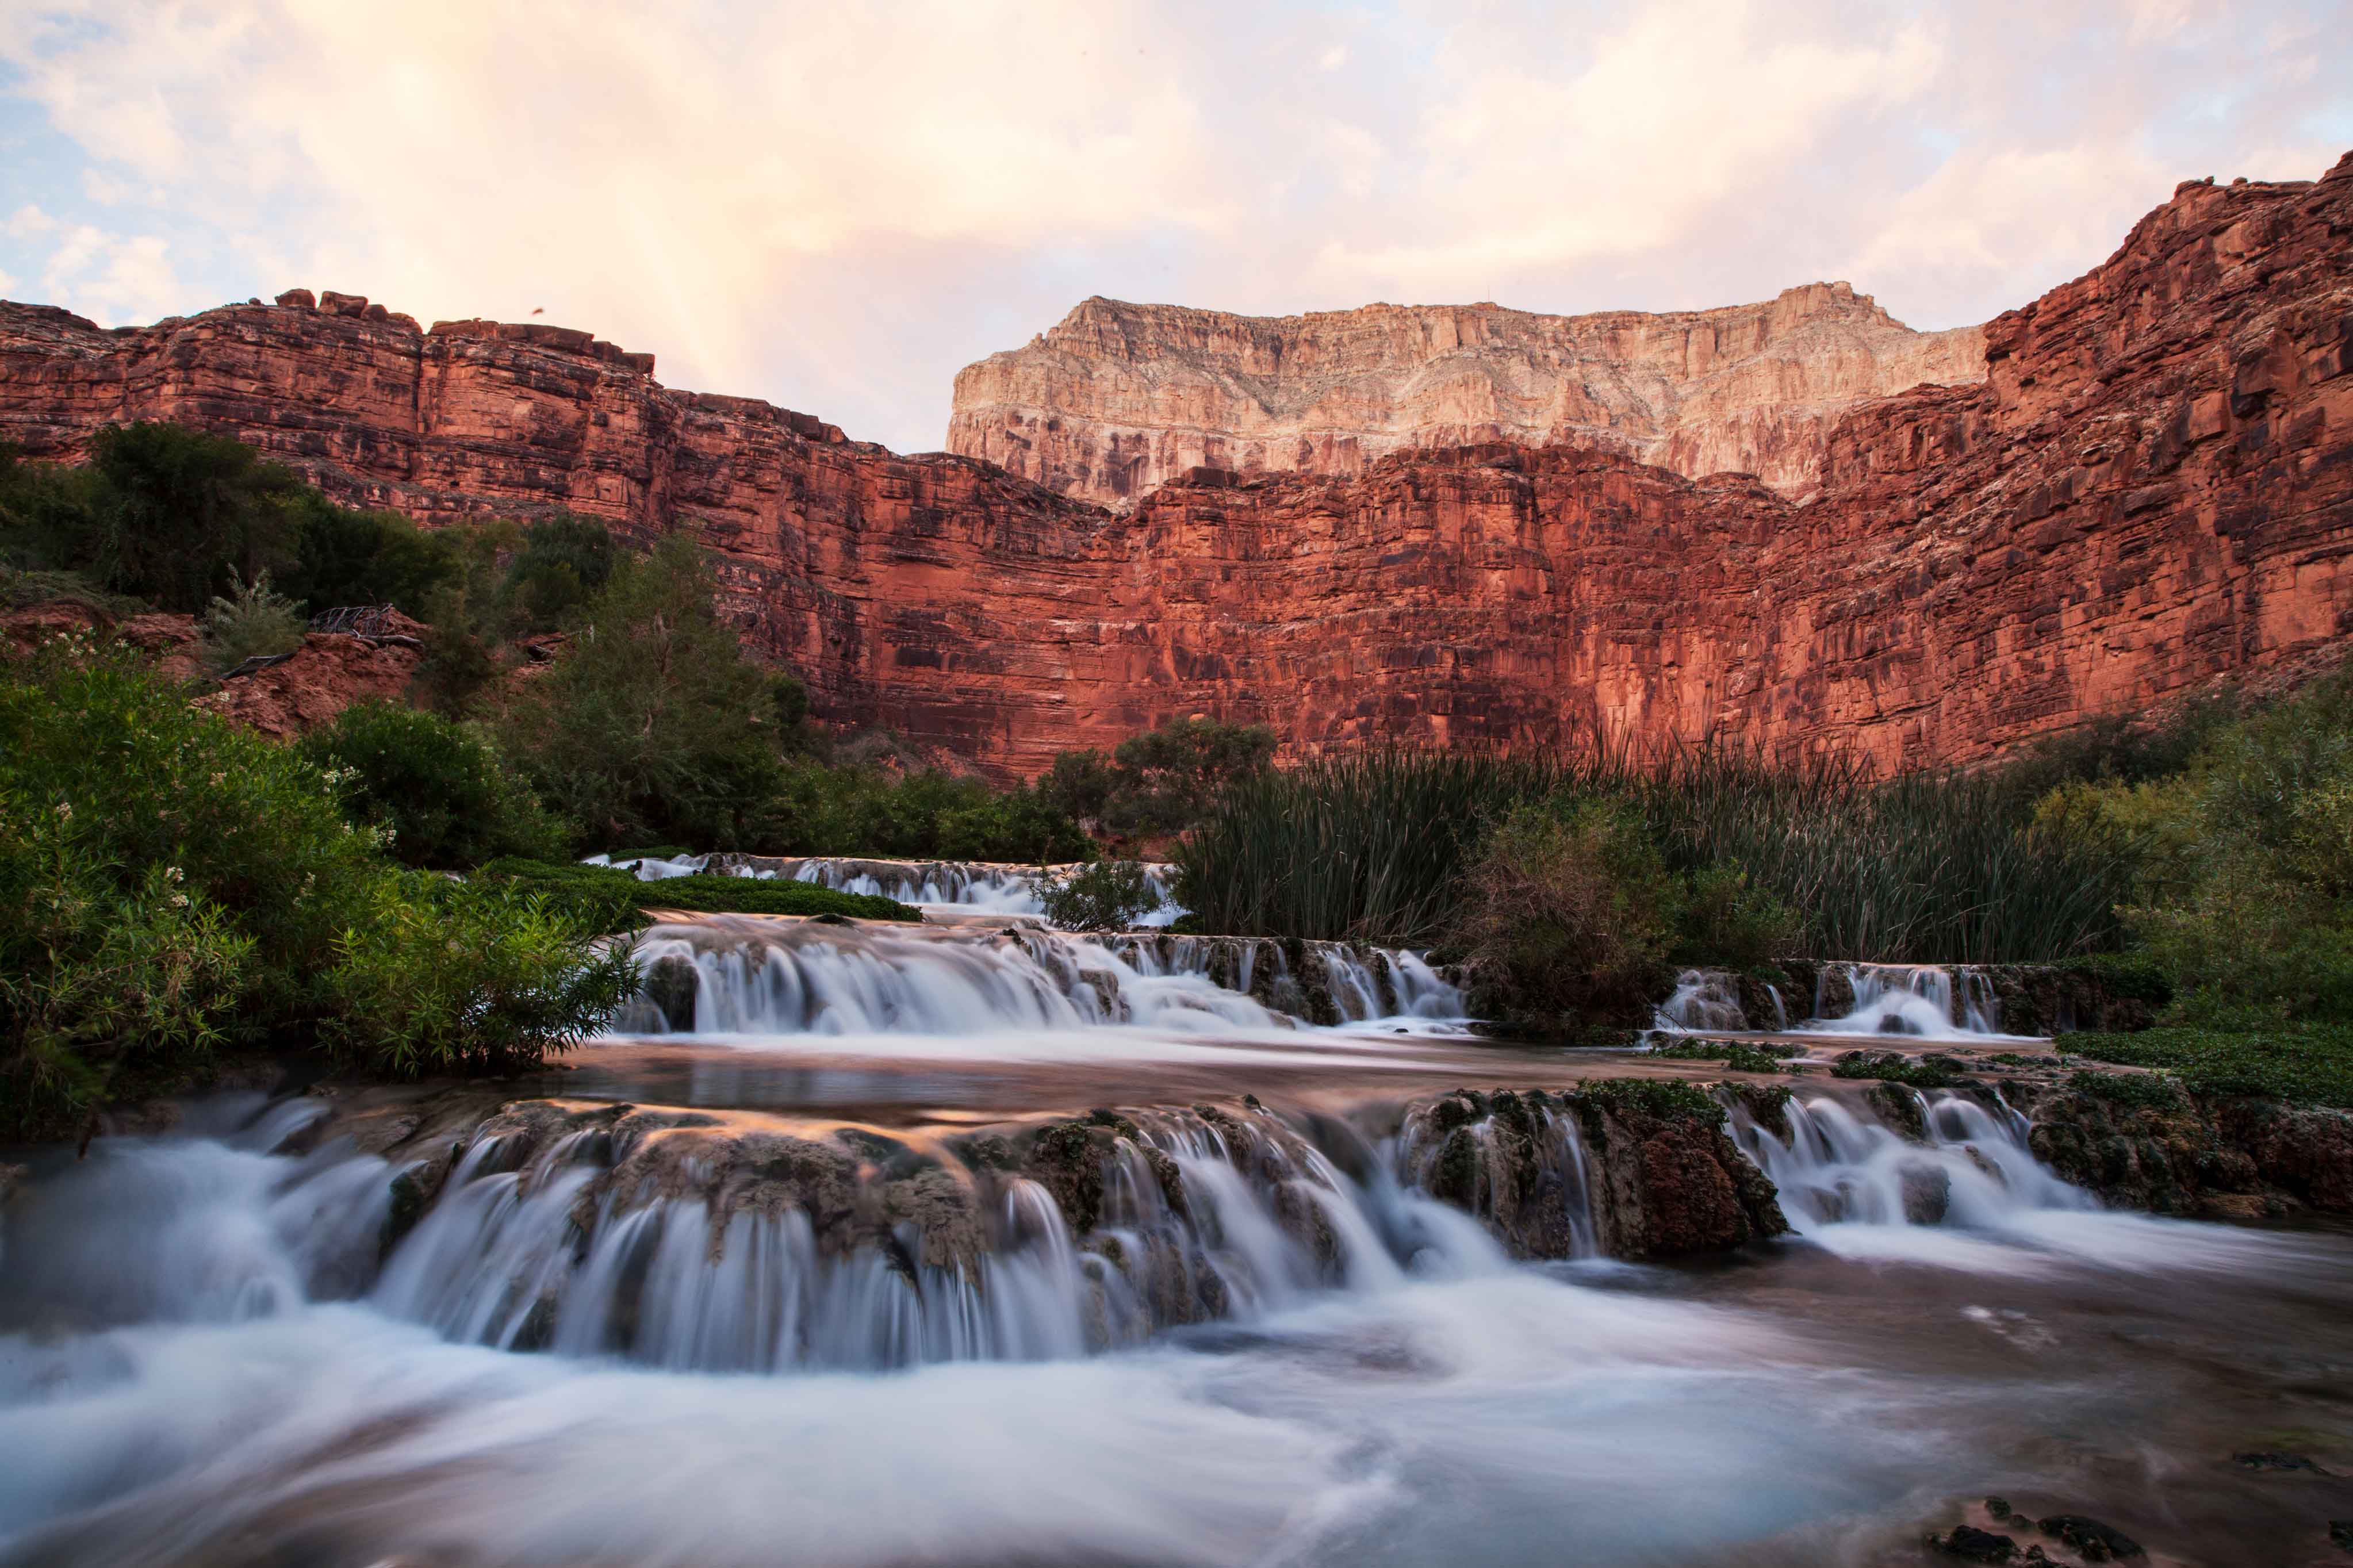
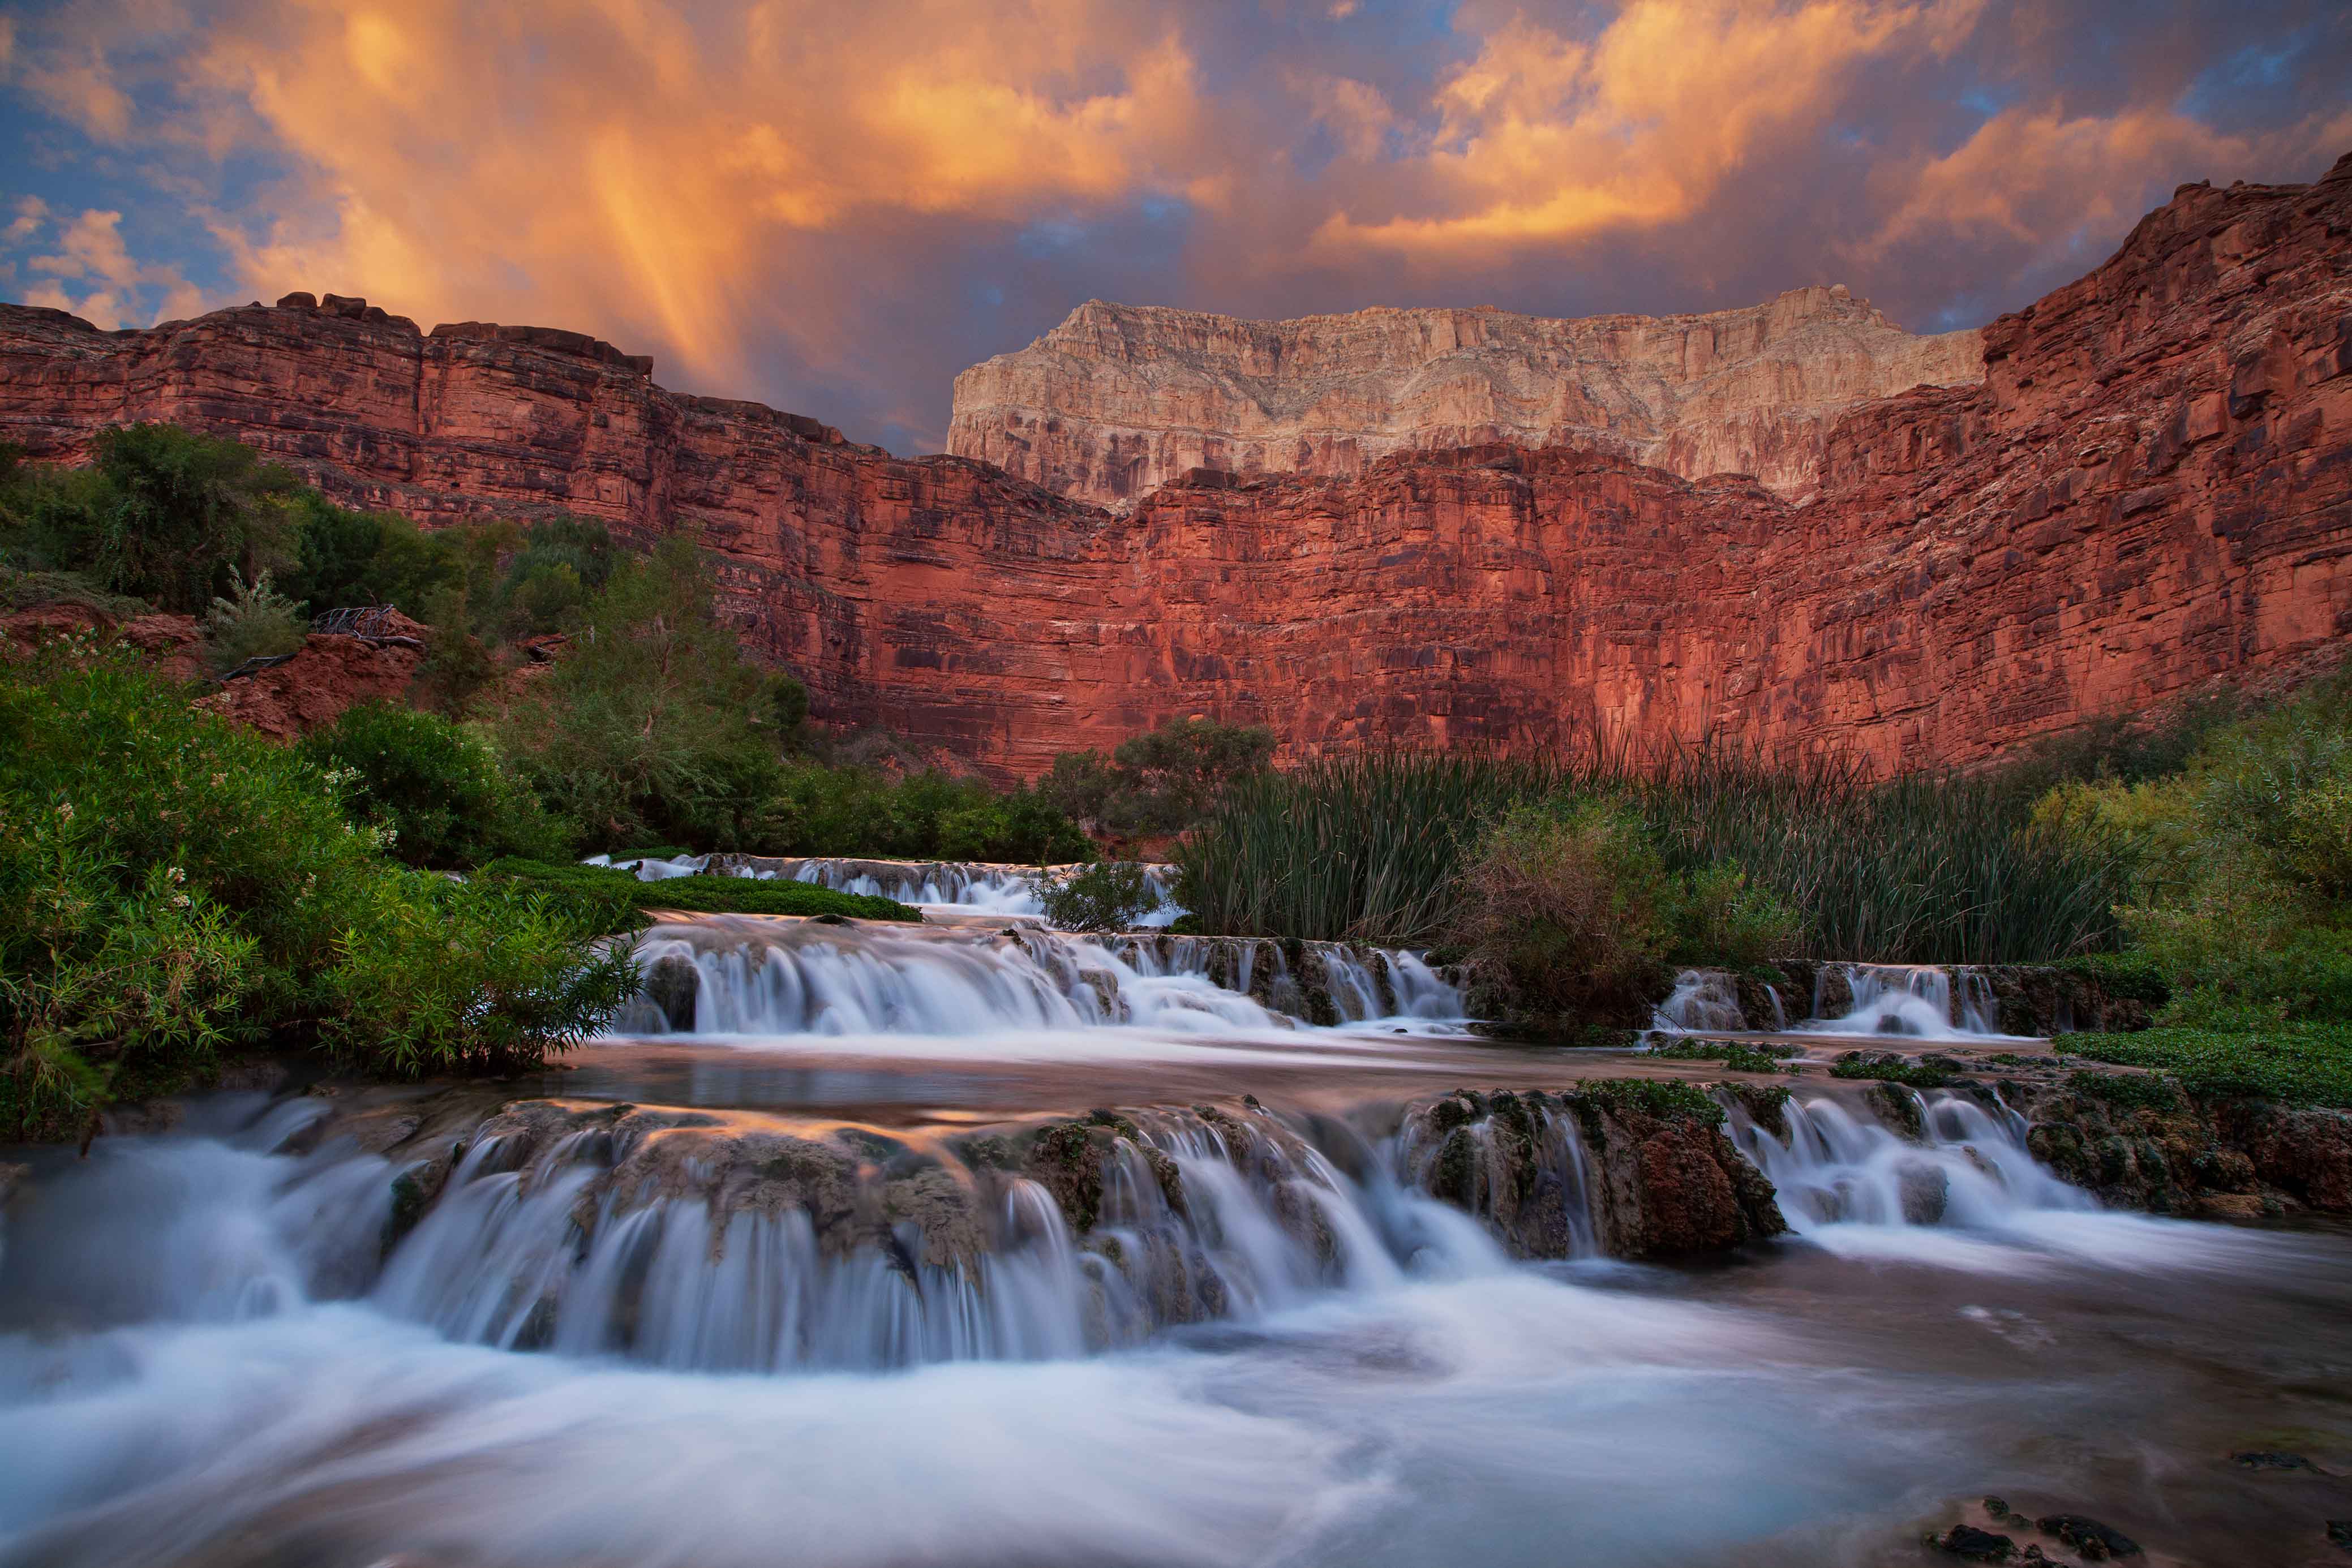
Many of my photographs combine several of the aformentioned techniques. That photo of poppies in the desert, for example, incorporates not only a "pattern to infinity" but also backlighting and a flash for the foreground (coming from the right side to make the poppies pop a little more). The photo of Havasu Creek in the Grand Canyon, which I used an example of HDR, is also an example of using a long shutter to make flowing water appear smooth. |
Equipment
Camera
People constantly ask what type of camera I use. Here's my answer. The photos throughout this website were taken over the past 15 years with five different cameras ranging from dirt cheap to very expensive. If you can tell exactly which pictures were taken with the "good cameras" and which were taken with the "bad cameras" I'll give you a million dollars. I know that's not the answer many people want to hear, but if you're getting poor results with the camera you're currently using then perhaps you should learn how to shoot. All that's really important, equipment-wise, is that you have a camera you can control 100% manually so you (not the camera) can select the shutter, aperture, ISO, point of focus, white balance, etc. If you can shoot manually, understand light, develop a good sense of composition and put lots of time and effort into your photo shoots then you can produce great images. In fact, I am quite certain that anyone who gets off "auto" mode and simply tries hard can eventually produce great images. It's not rocket science, it's just photography. Still, to do it well requires skill and effort, not expensive equipment. |
Lenses
As for lenses, I use three zoom lenses that combined range from 16mm to 300mm (wide-angle to telephoto). Some people say fixed lenses yield sharper images than zoom lenses. First of all, that has not been my experience. Any difference in quality is almost imperceptible. Secondly, in the wilderness there are trees, creeks, cliffs and such that often exist exactly where you prefer to stand in order to get the exact composition you want. This may not be a problem in a photo studio but it's a huge issue in the wild. Zoom lenses allow you to stand on one side of a natural obstacle or the other, then compensate by zooming in or out. In short, on rough terrain zoom lenses provide a level of creative flexibility that is infinitely more important than whatever miniscule difference in image sharpness fixed lenses might provide. And it's worth noting that nobody has ever said to me, "Hey, I'll buy that photo because it's so sharp." Customers do, however, buy photos that are creative and interesting. |
Flash
I also carry at least one flash in my camera backpack at all times (for special circumstances I may carry two or even three). Its range is of course limited but under some circumstances, when the main subject is not too big or far away, a flash is great for filling in shadows and lighting up an otherwise dark foreground. As with all my other equipment, the make and model of my flashes don't matter, it's how I use them that counts. It is, however, very helpful to have a "real" flash you can remove from the camera's hot shoe (as opposed to a built-in flash) so you may hold it off to the side of your subject, or at whatever angle you wish, for enhanced lighting effects. Also, there are times when the object you're trying to illuminate is at a considerable distance from the camera, and being able to remove the flash from the hotshoe enables you to place it closer to the subject for more lighting power. As mentioned earlier, using a single flash remotely requires a triggering accessory, such as a PocketWizard. My trigger system is wireless, very small and very simple for easy transport and use in the outdoors (it's nowhere near as bulky or complicated as, say, the system a professsional studio photographer may have). If using multimple flashes it's also possible to keep a "master" flash on the hotshoe, which will activate additional "slave" flashes remotely. Of course, the master/slave system requires you to carry two flashes, which adds weight while hiking, so unless I anticipate the need for multiple flashes I default to carrying just one flash triggered remotely. Finally, I always use flashes in manual mode, not TTL (auto). Balancing the foreground of a scene (the part being lit by flash) with the more distant background (lit by natural sunlight) can be a very tricky endeavor and to pull it off requires a level of control over the flash output that I actually find easier to achieve shooting manually. |
Tripod
I use a tripod that's worth its lack of weight in carbon-fiber, which is lighter than aluminum yet reduces vibration better. It's big enough to provide good stability yet small enough that I can actually hike with it. Really big, gigantic, over-size tripods tend to be used by ego-driven people more interested in looking cool than in actually hiking any significant distance into the wilderness and thus by people who don't really understand what nature and landscape photography is all about. My tripod can also be configured many different ways. It has a ball head for universal camera adjustment, legs that pull outward almost 90 degrees, and a center column that can be configured not only vertically (for up and down movement) but also horizontally (for left and right movement). All of these things provide great flexibility, enabling me to hold the camera at any angle, and at any height from high in the air to nearly touching the ground. |
Photographer's Backpack
Photographer's backpacks are incredibly useful, with special compartments for your camera, lenses, flashes and accessories. Beyond that I'll just say this. Forget about bells and whistles. As far as design goes, most packs are basically the same anyway, with more than enough pockets and compartments for all your stuff. Focus instead on durability. Some are made very well and others...not so much. The wilderness can be tough on backpacks and all you'll really want in the long run is one that remains in one piece. |
Lights, GPS, Maps and a Compass
No less important than any of the above photography equipment is a good light, GPS and map. Nature photography isn't just about being in the right place; it's about being in the right place at the right time. If the place is remote and the time is sunset, then guess what; you're going to hike back to your vehicle in the dark. And yes, despite what inexperienced outdoorspeople sometimes say, you can hike in the dark. However, for that you must have a reliable light (actually, make that two lights so you also have a backup). Any good flashlight will do, but for hiking a headlamp is even better because it frees up your hands to carry other things, like a GPS receiver. On that note, I always mark my vehicle's location with GPS, along with any other critical waypoints when heading into the wild. This is particularly important since I routinely hike off-trail and often return in the dark. However, the vast majority of the time I don't actually need GPS to find my way back, relying instead on good old-fashioned common sense, like noticing major landmarks I passed when hiking into the area earlier. However, I take comfort in knowing my GPS is there – just in case. By the way, I highly recommend using a real GPS receiver designed from the ground up for hiking, not some app on your phone that may or may not work in remote areas, isn't really designed for off-trail hiking, and does not allow you to change batteries. GPS is particularly useful when used in conjunction with traditional paper maps. I recommend detailed topographical maps, such as USGS topo maps, that show natural terrain like mountains, canyons and rivers as well as many human-made things like roads and buildings. Nothing provides peace of mind on dark moonless nights like knowing exactly where you are on a large, reliable, old-fashioned paper map. Finally, I should mention that I also carry a small, lightweight compass. And by small, I mean it almost looks like it came out of a Cracker Jack box. Yes, a compass provides some additional ability to navigate (if my GPS fails at least I'll always know which way is north). However, the real reason for carrying a compass is to determine exactly where on the horizon the sun or moon will rise or set. Various online sources (and perhaps your GPS) will tell you the exact time the sun and moon will rise and set, along with their exact locations on the horizon in compass degrees. I don't always plan to capture a rising\setting sun or moon, but when I do a compass is extrememly helpful when getting set up in advance, with the camera in exactly the right place and pointed the right dirction. And yes, a good GPS will also give you compass degrees (bearing, heading and such) but if you're just trying to determine which point on the horizon is, say, exactly 263 degrees, a conventional compass is much simpler, and the needle tends to be far more steady than whatever data your GPS is spewing out on the screen. Well lookie there, I ended up writing way more than I thought I would about how I do landscape photography. Still, if you have any questions feel free to email me at DaveWilsonImages@gmail.com. |
BACK TO TOP